A little while ago my friend Kim was nice enough to give me this cute bow shaped pencil case for my birthday. So cute!
I realised when she gave it to me that I had a big bow at home in my craft pile that came off a really cute bag which I’d accidentally spilled a drink on. I thought why not make a matching bigger version to keep even more pencils in!
And here they are together!
You could easily do this tutorial just with some spare fabric you have though.
This is the bow I started with.
I used:
Velcro
Ribbon
Needle and thread
Glue gun
First thing was taking it apart so it wasn’t joined up in the middle anymore.
I unpicked all of the stitching in the middle.
Then restitched it up the bottom, it wouldn’t be a very useful pencil case if they all just fell out the bottom haha!
So this is what I was left with.
I stitched the back pieces together as well.
At this point it was basically a big pouch.
Then on each side I folded the pleats up individually and stitched them together so they are held in place.
Next was creating something to hold the middle in place and hide the ugly marks from the original stitching. I only had thin ribbon rather than the thick stuff so I used 3 layers of it.
It was easier to just glue this than stitch because of the thick fabric. So two lots first:
Then one in the middle to cover the gaps.
And the ends were folded into the middle and glued in place.
Last thing to do is find a way to keep it closed. I didn’t have a zip the right colour so I used velcro. I snipped the middle so it would curve and follow the natural line of the bow.
After being glued in place it looked like this:
Not too bad!
Then it was just a matter of filling it with some more pencils!
Not quite big enough to fit all of my copic markers but maybe I’ll make a gigantic one!
A new segment I’m trying out where in I show my morning make up routine for various days and chat about what I’m doing that day. Not really a tutorial, more of a random girly chat while we get ready together in the bathroom 😉
Today’s style features some nice bright pink! .
~~~~~~~~~~~~
A blog and Youtube channel about a girl and her quest to make everything sparkle. New craft, hair and beauty tutorials every week!
Violet LeBeaux spends most of her time trying to think of ways to make life prettier, posting said ways on her blog and drinking very strong tea. She writes about big hair cute things, girly fashion, beauty finds, sometimes Hime Gyaru fashion (姫ギャル) and crafty tutorials.
She lives with her adorable boyfriend Jimmy, fluffy puppy Miss Lottie and Bergamot Bunny in Melbourne, Australia.
~~~~~~~~~~~~
Music: Garageband unless otherwise credited
~~~~~~~~~~~~
Morning Make Up – Fuchsia Fun Instructions
Welcome to another edition of Morning Make up in which I do my make out and we chat!
Today is a nice bright fuchsia which is still wearable!
Morning! I’m so excited because we just got approval from our landlord to get a dog!
unfortunately I still have to cover up this cut.
To cover pimples, cuts or anything else i use a dot of moisturiser to soften it up first.
Then some primer to hold the foundation on.
Then BB cream all over.
I’ve been waiting almost 10 years to get a dog, I’m beyond excited at the moment.
I pat some on my dark circles and the cut and leave it to dry for a few seconds.
Once it’s mostly dry, I pat again to blend it in.
This gives a really even finish and good coverage.
Mascara next!
I’m not sure which breed we will end up with as we’re going to rescue our dog from a shelter.
Champagne shimmer on the inner 2/3rds of the lid.
Something small and fluffy though!
White shimmer in the center of the lid concentrating around the lash line.
You guys are going to get so sick of all of the videos and photos I’m going to post.
There will be nothing but puppy spam for weeks!
Now the fuchsia!
I placed it in a rough pointed “C” shape on the outer corners.
We’ve been preparing the house since I got word from the realestate agent so now I just need to save up a little more money to have everything covered.
I want to be safe just in case we have unexpected vet bills or things like that.
And of course we have to get it some cute toys!
Time to blend it all together with a fluffy brush.
James is really excited too.
He always had dogs growing up but I haven’t had one since I was 7.
Next was eyeliner.
I used a fairly thin line with a wing so it didn’t cover the white.
My old dog was a Cavalier King Charles Spaniel called Bernard.
He was really cute.
Lash time! these are just some natural length criss cross lashes.
He was very cute but not very smart.
Bergamot joined in my “waiting for lashes to dry” dance today.
And now some finishing powder to hold everything in place.
I can’t wait to visit some of the shelters.
I used a dark pink shimmer lipstick.
I have to think of some names too!
What are your suggestions for a small fluffy dog?
And a very shiny orange toned lipgloss.
Lastly a litte more white shimmer as a highlighter because I forgot before!
All done and covered!
I hope this was a useful video, please check the blog post linked in the description for more information and tutorials.
Thanks so much for watching.
Oh my god, puppy!
Bye!
To celebrate all of the fun things going on here recently and my return to regular every day blogging (yes actually this time!) I thought it was high time that I gave you all a Bergamot themed craft: Bergamot Bunny ears!
While you can’t buy a Bergamot Bunny yet, you can make your own ears!
You need:
Cute coloured headband
White fabric (polar fleece is good)
Pink fabric (polar fleece is good)
Lace
Cardboard
Glue gun
Needle. thread, scissors
Start by drawing an ear shape on the cardboard. It should be very round and a bit fatter at the ends. Draw a little rectangle tab on the bottom too.
Cut them out and you should have something like this!
Cut out a rectangle of fabric which is big enough to cover the ear when it’s folded in half:
Trim it down so when folded in half it forms a case for the ear.
Stitch it shut around the outside leaving the hole at the bottom and flip it inside out.
Slip the cardboard inside.
Once you repeat for the other ones it should look something like this:
Now cut some pink hearts and stitch them on here:
Next fold the cardboard on the bottom ends so they form tabs.
These cardboard tabs will hold the ears up straight.
Now glue the cardboard tabs to the bottom side of your headband. Make sure you place them off to one side so they look just like Bergamot.
Glue the ends of the fabric around the bottom over the cardboard so it covers it all.
If you want to you can place a piece of felt over the top to make it even neater.
Taadaa 😀
Now the finishing touches, make a little lace bow. This is Bergamot’s favorite kind of lace.
And glue it to the base.
Now you have some adorable Bergamot ears so go wear them out somewhere!
Phew it’s been a while since I did nail art. I’m hoping to be able to do it more often soon. At the moment we’re kind of distracted by all of the puppy planning 😀 I had a craft day last week though and I’ve managed to cross off some reader requests coming up this week! I visited Daiso this week too so now I feel like I have a bit more inspiration for the Home Sweet Home project. recently I’ve been flailing about a bit with a lack of inspiration and motivation but now I have lots of plans!
This nail art look was inspired by Bornite aka Peacock stone. It’s really pretty so make sure you google some photos of it!
This tutorial is in one long image because it was made originally for Tumblr/Pinterest/Deviantart feel free to add me on there or share it around! You can also download it by right clicking and saving as 😀
A basic way to achieve a braided style which goes over the top of the head to the other side and ends in curls.
ghd provided me with one of the new Gloss Stylers to play with for these braiding videos, you can view the range here: http://www.ghdhair.com/au/hair-straighteners
This is the one I was provided with: http://www.ghdhair.com/au/limited-edition-ghds/ghd-red-gloss-iv-styler
I found it extremely easy to use, it heated up very quickly and left a very smooth finish on my hair. It gave big beautiful curls evenly and very quickly. It felt a lot smoother to use on my hair than the other straighteners I have. I would recommend it and I will be using it it many more hair tutorials so keep an eye out. .
~~~~~~~~~~~~
A blog and Youtube channel about a girl and her quest to make everything sparkle. New craft, hair and beauty tutorials every week!
Violet LeBeaux spends most of her time trying to think of ways to make life prettier, posting said ways on her blog and drinking very strong tea. She writes about big hair cute things, girly fashion, beauty finds, sometimes Hime Gyaru fashion (姫ギャル) and crafty tutorials.
She lives with her adorable boyfriend Jimmy, fluffy puppy Miss Lottie and Bergamot Bunny in Melbourne, Australia.
~~~~~~~~~~~~
Music: Garageband unless otherwise credited
~~~~~~~~~~~~
Curled Headband Braid Hair Style Instructions
Today I’ll be showing you how I do an over the head braided hairstyle.
Basic braiding knowledge is needed for this one.
I was lucky enough to be given one of the new GHD Gloss Stylers for review as well so I’ll be trying that out too.
Very pretty!
My hair was a bit messy so I straightened it to begin with.
Very smooth and manageable.
For this style you need to curl the hair tips a little bit.
This went much faster with the GHD than it usually does with my mini straightener.
The curls were much larger too.
This is what you’ll need to start with.
Have a hair tie ready and clip away your fringe.
Brush all of your hair over to one side of your head.
Grab a small section of hair just above the ear and begin a braid while making sure it’s pointing towards the other side of your head.
Begin braiding over your head.
Take very small sections on the side which is enat your forehead and take large sections on the back of your head.
When taking sections from the back, the sections should be thin but go all the way from the nape of your neck to the braid on the back.
Try to take sections very evenly so they are all the same width.
I think I need an overhead camera for this next time!
To give the braid more volume you can use sea salt spray at the roots.
Continue over to the other side of the head.
These braids look much better if you do them fairly loose so they have more volume and you can see the texture of the braid.
There will be some videos linked in the description showing the basic techniques of braiding in case you need a refresher.
Continue right over the other side until you run out of hair to braid and reach the ear.
Plait the rest of the way down leaving the end curls free.
Tie off with a hair tie.
Phew that can be pretty tiring on the arms.
Pull the plaited area so it is puffier and loose.
Fold the plait in half and poke it up into the braid at the back so the curls hang down but the band is hidden.
Pin it in place.
All finished!
It can take a little while to get the hang of having to braid in a different direction but the result is worth it!
Try practising on a friend before you do it on yourself so you can get the hang of it!
Thanks to GDH for providing me with a straightener too, you’ll be seeing more of it in future tutorials!
I hope this was a useful video, please check out the blog post linked in the description for more information and tutorials.
Thanks so much for watching!
Bye!
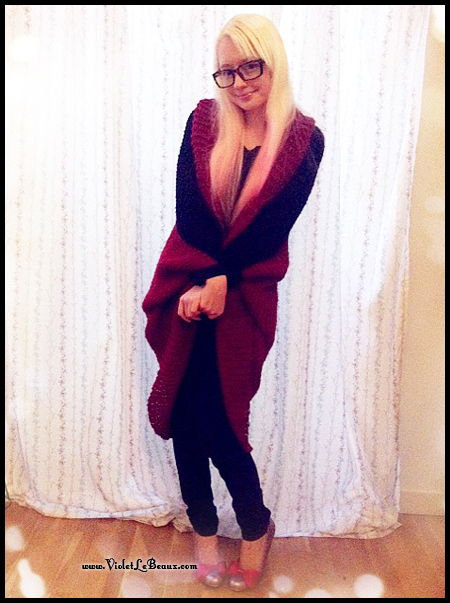
So remember when I made that big blue batwing style cardigan? And it was not bad but I wanted to try it out with a knitted fabric to give it a better drape?
While I was cleaning out our cupboards I found what I was planning to make it out of:
Back when we lived in Brisbane I spent months knitting these big blankets to use as throw rugs on our couches. When we moved they got shoved in the cupboard and eventually made their way to Melbourne with us. They probably would have actually been useful here with us having a real winter but I forgot about them completely so they lived in space bags until now!I used the same technique as last time, folding the corners in together to make the sleeves. The blanket was longer than it was wide so that made it a bit trickier.
I used a yarn needle to stitch it all together evenly.
The shape and fact that there was a thinner red stripe at one end actually make it a lot more jumper like because when laid out it naturally formed a folded collar. Totally looks like I planned it 😉 … which I totally did if anyone asks…
So there you go! I prefer this one to the blue one because it drapes beautifully and I really like chunky knits. The only problem I have is that it’s not quite wide enough so I might knit on some longer sleeves if I can find some matching yarn again.
Ugh that reminds me that I need to go through my yarn stash… it’s getting out of control and I haven’t made anything for ages!
Illustrator. Strong tea, knitting, watercolours, and making a video game called Moonlight in Garland. Living with her adorable husband Jimmy, fluffy puppy Miss Lottie and Bergamot Bunny in Melbourne, Australia.
By continuing to use the site, you agree to the use of cookies. more information
The cookie settings on this website are set to "allow cookies" to give you the best browsing experience possible. If you continue to use this website without changing your cookie settings or you click "Accept" below then you are consenting to this.


 Wouldn’t it be awesome to have a list of all of my downloadable tutorials? OMG so convenient! I know right?


![photo[1]](https://i1.wp.com/www.violetlebeaux.com/gallery/albums/Tutorials%20and%20Craft/batwing-cardigan-from-blanket/photo-1-.jpg "photo[1]")

![photo[2]](https://i1.wp.com/www.violetlebeaux.com/gallery/albums/Tutorials%20and%20Craft/batwing-cardigan-from-blanket/photo-2-.jpg "photo[2]")
