Daisy Magnet Tutorial – Quick Craft

Argh Summer (which has turned very wet and cold this week) has brought out my obsession of daisies again! I took down my wall of daisies a couple of months ago so I now have 50 or so of these little flowers laying around just waiting for fun adorable crafts to happen with them 😀

VioletLeBeaux-daisy-magnet-tutorial-0572_1291 copy

So the first thing I did with them was make some fridge magnets!

VioletLeBeaux-daisy-magnet-tutorial-0551_1289 copy

You need:

  • Fake flowers
  • Hot glue
  • Felt
  • Magnet strips
These daisies came on a big long chain which I dismantled, you can generally pull apart any cheap fake flowers and get something like this.

VioletLeBeaux-daisy-magnet-tutorial-0554_1289 copy

Because I want them to sit flat I snipped off the pointy part which attached to the stem.

VioletLeBeaux-daisy-magnet-tutorial-0556_1289 copy

Then I cut some little squares of magnet strips. The base of the flower is curved so I used felt to create a new base for the magnet to sit on.

VioletLeBeaux-daisy-magnet-tutorial-0557_1289 copy

Cut a circle of felt and leaving a little room in the middle, hot glue two of the sides like this.

VioletLeBeaux-daisy-magnet-tutorial-0562_1290 copy

Glue down the other two sides when the first ones are dry. Don’t pull it tight otherwise it won’t form a flat base.

VioletLeBeaux-daisy-magnet-tutorial-0565_1290 copy

Press down the middle bubble of felt with your finger and it should form a little flat square of felt.

VioletLeBeaux-daisy-magnet-tutorial-0566_1290 copy

Bam! You have a flat area to stick your magnet to… so glue it down ^_^

VioletLeBeaux-daisy-magnet-tutorial-0570_1291 copy

Winner!

VioletLeBeaux-daisy-magnet-tutorial-0571_1291 copy

Now make about 50 more and you’ve got an awesome fridge waiting to happen 😀

VioletLeBeaux-daisy-magnet-tutorial-0572_1291 copy

Any suggestions for other crafts using these? I’m going to make some hair pins/velcro/alice bands with them 😀 If it’s going to be stupidly hot and Summery I’m going to beat the weather at it’s own game >:D

Kawaii Clay Trinket Decoden Box DIY

Sometimes I just feel like making a big pile of sparkly pink whipped cream. Those days are when things like this come out of the craft pile ^_^

It’s a ridiculously glitterly pink trinket box of pinkness… and glitter.

VioletLeBeaux-clay-trinket-box-tutorial-30468_1379 copy

It all started with a box and a base coat of acrylic paint.VioletLeBeaux-clay-trinket-box-tutorial-20546_1288 copyVioletLeBeaux-clay-trinket-box-tutorial-20926_1325 copyThen several coats of glitter paint.VioletLeBeaux-clay-trinket-box-tutorial-20929_1325 copyVioletLeBeaux-clay-trinket-box-tutorial-20933_1325 copyVioletLeBeaux-clay-trinket-box-tutorial-30444_1377 copy

Then it was just a matter of piling on a lot of cute paper clay food I’d made several years ago.

VioletLeBeaux-clay-trinket-box-tutorial-30445_1377 copy

I did so by layering it all and hot gluing as I went.

VioletLeBeaux-clay-trinket-box-tutorial-30448_1377 copyVioletLeBeaux-clay-trinket-box-tutorial-30452_1378 copy

You can never have too much whipped cream on a project like this.

VioletLeBeaux-clay-trinket-box-tutorial-30457_1378 copyVioletLeBeaux-clay-trinket-box-tutorial-30458_1378 copy

Gaps filled with beads, pearls, diamantes and cabochons.

VioletLeBeaux-clay-trinket-box-tutorial-30467_1379 copy

DONE!

VioletLeBeaux-clay-trinket-box-tutorial-30468_1379 copy

A good way to get out the pink glitter that’s been building up in my brain and make a gift for someone I know will love it, now I just need to get the rest of her package together 😀

How to Make Drawer Liners

Another mini tutorial today while I try to get back into the swing of things. I started a small project last night (crochet bunny scent holder) to get me motivated to start some of the larger ones in the mean time here are photos I dug off my phone of how I lined my dresser drawer with leopard print.

The finished project:

Violet's Random Storage Ideas

What you need:

  • The drawer you’re planning to cover
  • Pretty paper
  • Clear sticky tape or thin double sided tape
  • Scissors

I was able to pull my drawer out of the dresser to make things easier.

Leopard Print Drawer Liners Tutorial

First thing to do is measure out enough paper to cover the bottom and up all of the sides. It’s much better to overestimate and have to cut off the excess later than it is to have to try and add more so be generous with your measurements. I am using wrapping paper I found at a junk store, you can use pretty much anything including pretty fabric.

Leopard Print Drawer Liners Tutorial

Now lay the paper over the drawer and poke the middle down until it touches the bottom. It’s easiest to start with one side and poke gently it until you can feel where the base of the drawer meets the side. Then run your fingernail or something that shape (but not sharp like a pencil) along the corner so the paper is creased into the correct shape.

Leopard Print Drawer Liners Tutorial

Continue around the edges doing that for each one. You’ll notice there are big extra triangles of paper in each corner. Push them to one side and press flat so the crease holds.

Leopard Print Drawer Liners Tutorial

If the pattern on your paper doesn’t match up because of the corner triangles you can unfold them and bend the creases the other way so the triangle is on the outside. Mine looked ok so I didn’t bother. Repeat until you have done all of the sides/corners and the piece of paper is the correct shape.

Leopard Print Drawer Liners Tutorial

Now pull the paper out and place a few strips of double sided take on the bottom to prevent it all moving around. Repeat on the sides and stick everything down securely. Use the scissors (or a sharp knife if you’re careful) to slice off all of the extra so it it’s the same height as the tops of the drawer. I decided to tape around the edges to make sure it was all secure, it’s only really necessary if you think your drawer will get a lot of use.

Leopard Print Drawer Liners Tutorial

Slot it back in and you’re done!

Leopard Print Drawer Liners Tutorial

A quick and easy way to decorate a plain drawer! Now I’m scheming what else I can cover with the leopard print paper because I’ve got like 3m left XD

Liz Lisa Themed Tea Bag Wallet Tutorial

Tea… my number 1 obsession. Craft… my number 2 obsession. When the two of them intersect it makes me a very happy girl. So how to make that happen? Craft a tea wallet for my purse! Some people are really particular about their teas blends, when I was little I had an adopted grandmother who loved lemon juice in her tea and rather than ask when she visited other people’s houses she would carry a bottle of it in her handbag… not even a small bottle… one of those big yellow squeezy bottles. Following on from that there are sometimes when I just desperately feel like a particular blend. When I worked in an office I had a huge collection of my favorites in my desk draw just in case! Now that I work for myself it’s all about portability and thus the tea wallet was decided upon.

This was my end result, it folds in half and fits neatly into a bag pocket…

Liz Lisa Themed Tea Wallet Tutorial

Indeed the stitching is not particularly neat but I think this was more of a test run for a better, prettier version so I didn’t want to spend a huge amount of time on it only to find out the end result sucked and I never used it! I’ve also just had no patience for crafts lately, hence the lack of tutorials >_< Now that I know it does get used I’m going to spend more time on a re-make and machine stitch it all :DWhat you need:

  • Fabric scraps
  • Needle/thread
  • Scissors
  • Tea bags to get measurements from
  • Felt for decoration

Liz Lisa Themed Tea Wallet Tutorial

First step let’s make the little bag part. You need two rectangles of fabric, one which fits two teabags with enough gab around them like this:

Liz Lisa Themed Tea Wallet Tutorial

And one which is as wide but around 3cm shorter so it can form a pocket like this:

Liz Lisa Themed Tea Wallet Tutorial

Working with the pocket, take your needle and thread and fold one of the long sides over twice to form a rolled seam. Stitch down to keep it in place. I’m using white thread so you can see where I’m stitching.

Liz Lisa Themed Tea Wallet Tutorial

Taadaa…

Liz Lisa Themed Tea Wallet Tutorial

Lay it on top of the larger piece with the seam facing up.

Liz Lisa Themed Tea Wallet Tutorial

Stitch around the edges of the pocket like this…

Liz Lisa Themed Tea Wallet Tutorial

And flip the whole thing inside out ^_^

Liz Lisa Themed Tea Wallet Tutorial

You should have something like this!

Liz Lisa Themed Tea Wallet Tutorial

Next fold the edges around the top and sides in and stitch all around the outside. Also stitch a line in the middle so it becomes 2 pockets.

Liz Lisa Themed Tea Wallet Tutorial

You should have something along these lines…

Liz Lisa Themed Tea Wallet Tutorial

Now it’s time for decorations. I chose to use the Lizlisa mascots because they are adorable and the girl has her hair in my absolute favorite style! I love the little lamb and girl mascots so much they are my phone background too XD You can see the originals on the Lizlisa tumblr here.

So I cut out my felt pieces to match, you can use anything though. If anyone wants a pattern for these let me know and I’ll add it to the list. I’m planning to put up around 10 patterns for old tutorials at a time starting in the next few weeks once I’ve stopped moving around so much.

Liz Lisa Themed Tea Wallet Tutorial

Very easy to do… just stitch the felt characters on.

Liz Lisa Themed Tea Wallet Tutorial

The girl was too big because I didn’t really think it all through so I decided to just leave her hair sticking up over the top as a point of interest. Big hair for the win XD

Liz Lisa Themed Tea Wallet Tutorial

After everything’s in place just stitch on their faces and any details they’re missing and you’re finished!

Liz Lisa Themed Tea Wallet Tutorial

When I re-do it I’m going to add a lot more detail to the faces and maybe do full on embroidery in the various colours.

Liz Lisa Themed Tea Wallet Tutorial

And inside…

Liz Lisa Themed Tea Wallet Tutorial

So there you go, a tea project for tea tragics like me XD Hope that was a useful starting point for some of you and fingers crossed I get time for more crafting next weekend so I can maybe get my groove back with it >_<

How To Make A Photography Light Tent – Guest Post by James

A lot of you guys write to me with photography questions and while I love looking at pretty photos and I do *kind of* dabble in it I am really not knowledgeable about the subject in the slightest. In fact, pretty much any knowledge about photography I have is based on things James tells me or if I’ve learned it myself it’s through trial and error. That said I want to be as helpful as I can so I usually inlist his help in answering photography questions. A lot of people ask about taking product photos for review posts and the like, I like nice clean white backgrounds so all of mine are taken inside a light box. We recently bought our own but up until a few weeks ago we were using James’ DIY method. He wrote a post about it around a year ago so I though I would get him to guest post about it here because it might be helpful for you guys ^_^ If you find this one useful or if you have questions just leave them in the comments section and I might be able to convince him to do a regular guest spot here! I’ve added a couple of little comments into the post in this colour too 🙂

Ever wonder how those eBay sellers get such nice, even lighting on their products? While some may use expensive lighting set-ups like soft-boxes and ring flashes, you don’t have to go down that road. Especially if you are selling smaller items, you can use something called a Light Tent.


These go by many names; light box, light tent…light cube. Well I guess that’s it. You can buy folding ones on eBay like this for around $39.95, but  let’s say you don’t have the money or you have a job the next day and don’t have to the time to wait for delivery. While it might not look super professional, you can make your own using things around the house. (This version also is good if you live in an apartment because you can throw it away after you’re done and make a new one next time! ~V)All you need is:

  1. 5 pieces of paper that are all the same length, I’m working with A4 printer paper (Don’t steal your girlfriend’s fancy expensive art paper without asking, she will be mad if you do, trust me! ~V)
  2. A roll of tape. Clear is best, but what every you can find should work as long as it’s not colored
  3. Scissors. If you don’t have these, then don’t freak out, it just makes things a little neater.
  4. Possibly a chopstick or ruler or something to prop your light tent up
  5. Light source. External flash would be best, but before I had one I used everything from desk lamps to floodlights

Ok, to start with you are going to need to turn one of your pieces of paper into a square. There are two ways to do this. The first way is to get out your ruler and measure yourself a square. The second I feel is faster, but kind of hard to explain, so bear with me. Take two pieces of paper. Lay one sideways on top ofthe other one to make an L shape. Anything that is over the edge of the bottom piece has got to go, so cut it off. Voila! You should be left with one A4 piece and one square. If you still aren’t following I’m going to try to make a very simple picture diagram.

If it’s not working for you, give up and get a ruler. If you don’t have scissors to cut it, just fold the piece again and again and again and then it should tear down that crease fairly accurately. Now take three of your pieces of paper and put them side by side so that they are tall, not long. Then take the square piece you just made and place it above the middle Piece of paper. Last step, take your last A4 piece of paper and put it above the square piece. Confused yet? Here’s a picture of what it should look like.

Kind of like an upside down T right? Good. Now we are going to tape all of this together. So you can easily see where I think you should tape, I’ll photoshop in some dark grey bars. You can tape yours where ever your heart desires! Did any of you do these at school in geometry class? Basically what we are trying to do is turn this shape into a cube, so as well as putting the tape marks in, I’ll label what the pieces are going to be when it’s done.

Ok, once those are taped, you fold up the sides and back, then tape them together. Fold the roof down and then tape that to the sides. You’re done! You should have a rectangular cube without a front. The taping can be a bit tricky, so instead of taping the roof piece to the back piece, you could tape all the A4 pieces side by side, and then fold them over so it makes kind of a square wheel. See below.

Whatever you decide to do, the result will come out the same and that is looking something like this. (Basically you made a box with one of the square sides missing ~V)

Obviously, this isn’t all taped up correctly, but I roughly taped it up and then forgot to the take a picture of the final result. When you lay it down it is going to sag because it’s just paper and as any architect will tell you, paper doesn’t make good building material. To combat this you can find something that is roughly the same height as the box it’s self. As you can see, I used chopsticks. Now it can hold it’s self up and smells delicious!

So how do you set up your lights? Any way you want. Experimenting is the key to finding your signature look, But if you just want some even lighting, here is the way I have set up my lights.

As you can see I have my main light source propped up a bit to shoot down at an angle, then my reflector (which again is just a car sun shade) on the other side to bounce some light back in. Thanks to all the white the light will bounce around inside the light tent, eliminating pretty much all of the shadows. (If you don’t have fancy lighting don’t worry, just stick a desk lamp over it or one from each side so it’s nice and even ~V)

Let’s look at some examples!

One of my favorite belt buckles.

A little something for Easter.

And some product shots I did for Violet.


As you can see, these things can be terribly useful and come together in a couple of minutes.

Some tips for shooting in a Light Tent

1. Shoot in manual mode, this will avoid the tricky metering problems and allow you to expose the way you want to consistently.

2. Drop your flash’s power down to 1/2 or 1/4 power.

3. Keep your aperture at around f/5.6 or higher. When you are this close to the subject and zoomed in for close up’s it’s easy to think the whole product is going to be in focus, but when you switch to the computer you find your shallow depth of  field has let you down. Learn from my mistakes people.

4. If you are going to be cutting these out of the white background, over exposing your shots will make the background whiter and easier to cut out.

Now get busy!

Thanks for all of that information James! Hope that answered some questions and please let me know if you have any more. I would love to see if any of you give it a try!

James writes a general photography blog over at www.JimmyAmerica.com so go visit him and say hi!

Violet's Fun Storage Ideas- Dresser

Following on from my previous storage idea posts today we move on to my dresser! If you need to catch up you can find the first post on my wardrobe here and the updated wardrobe one here.

My dresser is really precious to me, my Mother bought it somewhere in Brisbane and when she moved to Japan I kept it, it’s moved through 5 houses so far and was the only piece of furniture that we bothered taking from Brisbane to Melbourne with us. It was almost left behind because of space constrictions but James’ parents were lovely enough to drive it down for us.

While it’s most likely not actually an antique I love the style and all of the detail in it, the seat has been reupholstered from the looks of it and is about due to be done again so that’s on my list of projects to do ^_^

I dont’ usually sit down and do things like hair or make up here but it makes a great storage space as well as looking very pretty.

Violet's Random Storage Ideas

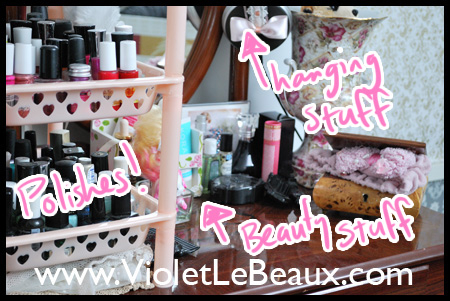
Main points about it:

  • The stool leaves ample storage space underneath so I keep our fan there. There is also room for more storage on either side.
  • The drawer holds all the pretty things that are a bit useless but too pretty to throw away.
  • Lots of storage space for nail polishes and gloves underneath that!
  • Night time cream, perfumes and anything that feels nice and luxurious ends up on this table. It’s where I look and sit when I’m feeling a bit down because all the pretty things really cheer me up!
  • I keep things here that I need in a hurry when getting dressed like safety pins or small scissors to snip threads on a dress.
  • Once I get some better lighting I am planning to set this up as my new video area so I can film make up and hair tutorials much more easily 😀
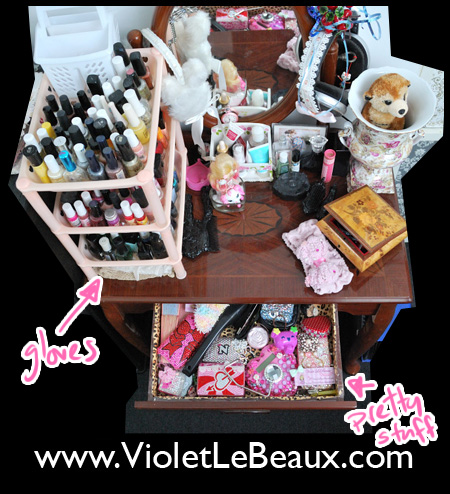
  • I keep my gloves underneath the nail polish for easy access in winter.

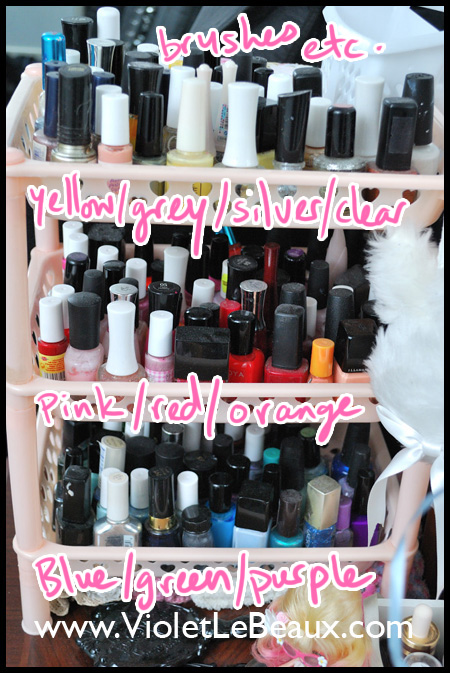
So let’s look at stuff in a bit more detail! Firstly the nail polish.

Violet's Random Storage Ideas

For the longest time I couldn’t decide how I wanted to store my nail polishes. In our town house I didn’t have many so I kept them in a bag, then it became a big plastic box then there were so many that I lined my windows with them then there were too many for that too so I sucked it up and finally bought some little shelves. I loved these shelves because they are quite roomy so you can still see which polish is which as well as being adorable with the little heart cut outs along the side.

I divide the polishes up by colour so I can quickly find things I need for nail art. Most of my other nail art supplies are kept in a box with my crafting things but I keep basics that I use a lot like small brushes, nail treatments etc here for easy access.

Violet's Random Storage Ideas

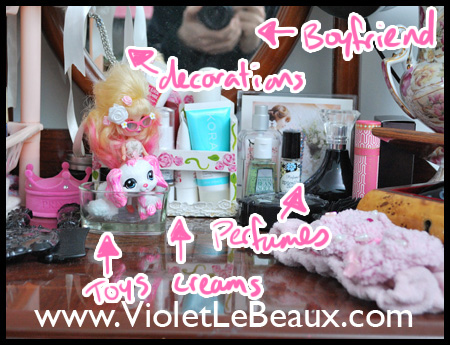
I like to hang and decorate the mirror of this too, it’s the perfect place to put headphones, earmuffs and other things roughly that shape. Of course I made those bunny ear muffs like 6 years ago and still have not used them once so at this point I’d say they are definitely more decorative than functional XD I decorated the mirror with a pocket watch I bought in Japan and some A.P. charms.

Moving over to the middle…

Violet's Random Storage Ideas

I have a stack of night creams and things I’m working through for reviews or testing out so they all sit here. To be honest so far none of them have had noticeable results either good or bad so I haven’t bothered writing about them yet! They are all housed in the little wooden box I decorated ages ago.

Next to that there is an old Innocent World calendar that was given to me by a great friend many years ago and in front of that is my small collection of perfumes. I don’t generally wear much perfume but there are some I love (like MOR, The Body Shop’s Cherry Blossom, Epicly Epic’s Cake fragrance) so they keep here along with others that were either sent by PR agencies or happen to have pretty bottles that I’m trying to work out how to refill with something better without damaging XD

I also keep little random pretty things I’ve collected here like pretty combs/mirrors/dolls etc.

I like to keep similar items grouped together like all my perfumes in one place, all my hair things in one place etc because I’m so forgetful that if I don’t know where to look I will probably never use them >_<

In front of that…


Violet's Random Storage Ideas

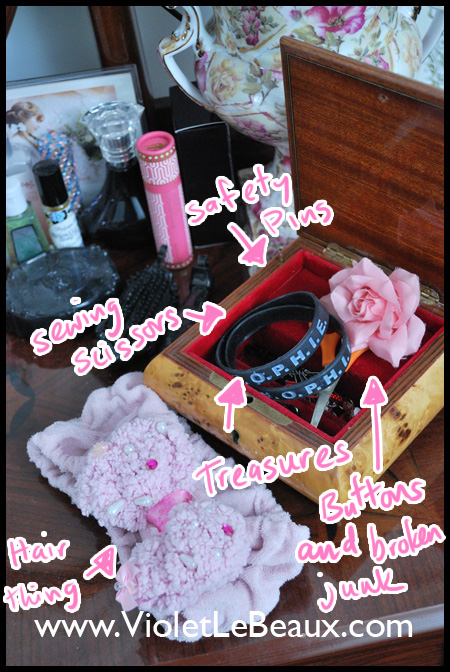
Next we have a music box that was my grandmothers (I think) and it’s home to utility things like scissors and safety pins. It also holds things I’ve just taken off when I got home but not gotten around to putting away like the S.O.P.H.I.E bracelets. I keep my (no idea what this is actually called so I’m going to guess) make up hair pulling back headband thing here too so if I’m applying moisturisers etc I don’t have to go and try to find it in the bathroom XD

The right side:

Violet's Random Storage Ideas

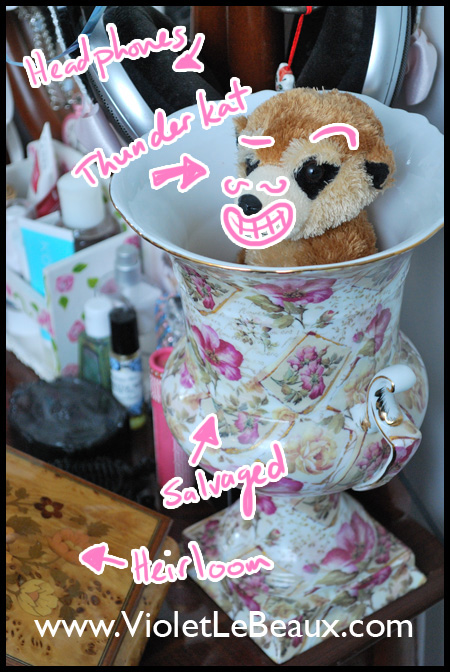
This vase was another pretty find from the throw away pile in our building. Some people moved out and their entire house was furnished with this kind of thing and everything they couldn’t sell just got dumped in the hard rubbish downstairs, that was a great day!! I am allergic to flowers so inside lives my meerkat from the Melbourne Zoo, his name is ThunderKat and I think he should have that expression all the time XD

Again when you have limited space, it’s a good idea to fill every place you can with stuff. We don’t have a linen cupboard so underneath ThunderKat is used to store tea towels for the kitchen!

From above…

Violet's Random Storage Ideas

You can see that while there is a whole lot of stuff on the dresser it’s organised well enough that there is still space in the middle so it’s functional. All of the larger items are at the back so I can easily see everything at a glance.

Inside the drawer…

Violet's Random Storage Ideas

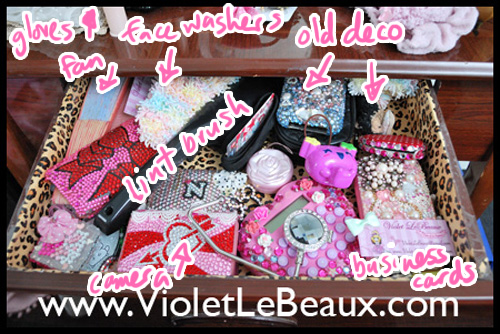
I lined the drawer with leopard print paper (tutorial coming soon) to make it a bit more me and like a crazy hidden oasis of bling inside a nice fancy old fashioned dresser. I suppose that’s maybe a metaphor for myself hahaha!

Inside it I keep all of my deco projects that I no longer use daily but can’t stand to throw away. Business cards, old phone cases, cameras, keep sakes, anything shiny and pretty that doesn’t have a home anywhere else. It’s so bright in here it’s like looking into the sun 😉

The only sensible thing here is the lint brush which is useful and I need in quick reach for when going out. Everything here is pretty haphazardly thrown in but I think that’s what I like about it 😀 You wouldn’t know it too look at but this little dresser holds so much stuff that it’s become a really valuable piece of storage in my room.

So that’s it about this one I think. Let me know if you have any questions and if this has been useful, next time I will show you my sets of shelves, then shoes, craft area and bathroom after that ^_^

By continuing to use the site, you agree to the use of cookies. more information

The cookie settings on this website are set to "allow cookies" to give you the best browsing experience possible. If you continue to use this website without changing your cookie settings or you click "Accept" below then you are consenting to this.

Close