

Lazy Tulips Nail Art Tutorial
I’m so behind on all of the nail art tutorials I’ve promised from the last few months… or maybe years >_> But things are changing, I’m feeling proactive and inspired for the first time in ages 😀 I’m going to write about my lazy inspiration but the general idea is that I’m going to embrace my laziness but find ways to continue being inspired… hence the name lazy inspirations XD So today let’s do the tulip nails I posted on my Instagram a few weeks ago! This is actually kind of timely, we’re going to a tulip festival next weekend, exciting! 
|
The beauty of this design is that it doesn’t have to be perfect! You need:
Start with a base coat of something bright. Load your brush with white paint and make a little curvy “C” shape just below the middle of the nail. |


Want to download this tutorial in one handy file?

How To Add A Pop Of Colour To A Necklace
I’m still feeling really low energy from being so sick at the moment so it’s a quick craft today.
I’m really into big, bright, chunky jewellery at the moment but I think most of the stuff I see in store is ridiculously priced so I figured I would just make some myself. My mum found a cheap metal necklace at a store which was closing down but it was very plain and not me.
This is what a few coats of nail polish did to it:

|
The original necklace:
The polish I used:
It took several coats to get a nice even finish and make the colours really pop. It was very messy trying to get the polish on while they were all still attached. I ended up giving up being neat and using remover to get rid of the messy parts afterwards.
And there it is, bright and pretty! It took a few days because I had to wait for it to dry between each coat.
Now I’m on the hunt for other cheap jewellery I can jazz up. Maybe I’ll check the thrift store and see what pops up there. I just realised that with the sunglasses and jewellery and all the other stuff I’ve been painting more stuff than nails with my nail polish lately XD I should get back to doing my nails!
|


10 Lazy Day Hairstyle Tutorials With RY and GHD
This post was sponsored by RY.com.au.
For more information on sponsored posts please click here.
I was contacted a little while ago by RY.com.au to try out some of their products and considering my hair obsession we settled on a GHD to play with!
As you guys know by now, I’m trying to make my life a bit better one tiny thing at a time in hopes that all the tiny things will add up to big things and being happier in general. As silly as it sounds, when I look good I feel a lot happier and more motivated.
In my ideal life where I’m so rich that I never have to worry about money or anything other than which beautiful gown I’ll wear that day I think I would spend a large amount of time doing my hair every morning. Unfortunately in real life, time-to-do-my-hair tends to get over run by time-doing-the-washing. So the age old problem: how to look cute without having to spend hours doing it?
So I’m taking on bad hair days with the help of RY and GHD! I came up with 10 hairstyles that can be done in less than 5 minutes, perfect for busy and lazy days!
But before we get into the hairstyles, let’s do a quick review of the GHD 😀
Lottie was totally begging me to straighten out her crimps but I don’t trust her to use hot appliances without supervision.

|
RY is one of Australia’s biggest beauty supply websites, they stock all of the major brands often at discounted prices. They also ship internationally and stock a lot of Australian skin care brands which are hard to find overseas so make sure to take a look! RY also has a price match guarantee for Australian websites and a points system as well.Here’s some information from their site:
The box from RY was shipped and arrived within 2 days which is so quick considering how long AusPost usually takes. They also have a pick up location in QLD which would be quite convenient. It came with some little samples and was packed securely with paper and a bag.
The GHD I picked was the Pink Diamond V Gold Classic Styler 24mm.
This model is partnered with the Breast Cancer Foundation so the price of $264.95 (on sale from $289) includes a $20 donation.
From the RY website the features are:
Inside the box is the very bright and pretty pink GHD and also a huuuge flat brush.
I’ve tried just about every straightener known to man and I really do have a soft spot for GHDs. It sounds silly but a straightener’s main function is to heat and a lot of the cheaper models just can’t get hot enough to work with my hair.
The 24mm is a really good size for creating curls too, it’s big enough that you don’t need to spend all morning doing them but it’s small enough to get tight curls and still be reasonable to travel with. I like the fact that these new models are really light too, compared to the older ones I’ve used this feels like holding nothing. When you have flimsy weak arms like me that’s a big plus haha!
So back to the idea of quick hairstyles that you can do on busy mornings… I’ve got 10 tutorials just for that purpose! A lot of them are very basic styles but sometimes basic is all you need when it’s a choice between 10 more minutes of sleep or hair styling! This is totally a continuation of my Inspiration For The Lazy series. Each of these took only a few minutes to do with the GHD so now I know I have no excuse not to do something with my hair every morning. Let’s get into it! Style #1: Straight.This is a pretty obvious style but so long as you can get some volume in your fringe I think it’s still really effective. I get more fringe volume by brushing it to the opposite side to usual.
Style #2: SleekAnother variation of that straight style is pulling pulling the fringe back and teasing a little. I them like to leave some side bits down and use a headband to hold it in place. Very preppy!
Style #3: FishtailI love fishtail braids so much. They are so much cuter than regular plaits! I usually wear one over my shoulder but two is super cute too ^_^
Style #4: Mini PonytailThis is one of my favorite lazy day styles because it has a lot of top volume but takes no more time than a regular ponytail!
Style #5: Side sweptI love side swept hair lately, and now that I’ve mastered pinning it at the back of my head so I don’t have to keep flipping it around the right side every 10 minutes it’s even more convenient.
Style #6: Side ponySo did I mention I liked hairstyles which are one sided? I don’t know why but this seems so much more interesting than a regular ponytail to me!
Style #7: Side bunYep it’s another side style but they just look so good! This one takes a little more effort because of the sheer number of plaits but the end result looks so complicated it’s worth it.
Style #8: The loopThis style has so many variations: do a loop on either side, do two loops. It’s such a retro style and looks even better in short hair!
Style #9: Double TwistIf you exaggerate the twists more you can get the nekomimi style too!
Style #10: CurlsThis one does take a little longer but I justify this because I can use the curls in different hairstyles for like 3 days so it really saves time in the long run. Justified!
Bonus style 11: UpdoThis is what I mean about using the curls for several days, the next day I just mess them up and make a big poufy updo!
So there you have it, 11 quick and easy styles using the GHD!
I think even though they take a little longer my favorite is still the curls ^_^
So overall verdict on the GHD: love it for quick lazy styling. Super fast to heat up, easy to use, light weight and the colour is very cute.
If you want to get your own, make sure to check out RY.com.au and have a look at the massive selection of all kinds of GHD straighteners. Hair down, now I just need to work on making changes in the rest of my life!
|


How To Crochet A 365 Day Shaggy Loop Rug – Home Sweet Home
So remember almost 9 months ago when I posted the finished Home Sweet Home project? Yeah, me either >_>
Anyway there were many, many, many requests on how to make my white rug, the one from the lounge room:

|
Well I have written this post like 3 times now but the original photos were lost and bla bla bla other excuses that no one cares about. Anyway I made Lottie a matching mini rug so I could retake the photos and here we are!
You need yarn and a large crochet hook. I’m using some fuzzy chenille yarn and a 5.5mm afgan hook.
Start with a foundation chain which is as long as you want the rug to be.
Chain 2 more.
The basis of this entire rug is a single crochet stitch with an extra long loop hanging out the back. When you have so many loops they form a thick shag pile. So poke the hook through the 3rd chain. Wrap the yarn around your left index finger to form a big loop. Use your hook to pull the tail end of that loop through the chain. Now you have one large loop at the back of the chain and two regular loops on your needle!
Now wrap the yarn around the hook.
Use the hook to pull the last loop through the other two. Now you have one big loop at the back and one on the hook. Done and ready for next stitch.
So basically you’re just doing a single crochet stitch over and over again but at the beginning you’re wrapping the yarn around your finger so there’s a huge loop hanging out the back. I’m thinking it might be easier to explain this in a video!
Repeat this stitch until you reach the end of the row. It will feel awkward at first but it gets much easier. When you reach the end of the row chain two, turn and go back the other way. This time the loops will be on the wrong side so after each stitch move the big loop to the front and begin the next stitch. If you want a less thick pile you could always just do a regular single crochet every second row but I love how plush this version is:
After a few rows you’ll get something like this with a flat back and a bobbly front:
And eventually something like this…
Then this…
And like 6 billion years later something like this:
Once you get to this length you’re half way there! This is why we called this the 365 Day Rug!
And that’s really it, I ended up doing mine in two sections because I wasn’t sure how much yarn I would have but it worked out well because even at this size it was completely unruly to work on and a real pain in the butt. I probably wouldn’t make one of these again unless I was going to do it in lots of small sections. It gets far too heavy to work on something this big! Anyway I’m glad this tutorial is out of the way finally, let me know if you try it out or have any questions! |


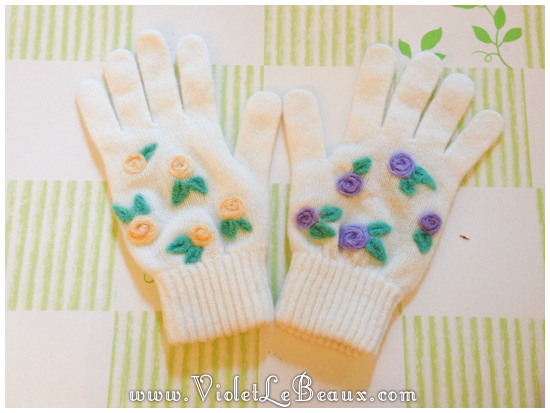
How To Needle Felt Rose Gloves – Tutorial
Recently I have been making a lot of presents for people! I like making presents because it means getting to craft and not having the results taking up a lot of space here 😀
The only down side is I have to wait for them to receive it before I post photos and tutorials haha!
I needle felted these gloves as a birthday gift for Christina who rocks.

|
So how to needle felt flowers? Let’s start! You need:
I decided to do different colours per glove so one purple and one yellow with green flowers.
The gloves!
Stick the brush or whatever you’re using for backing inside the glove. It can be a bit awkward depending on the size. By actually putting the brush inside the glove the sides won’t stick together when we felt them.
Now let’s make the flowers. Felt a small yellow ball to the glove. Poke more around the edges to secure them.
Now punch a spiral pattern into the circle.
Next add a tear shaped petal and poke in the middle as a leaf shape.
Add a second one just overlapping it.
Repeat all over the glove in varying directions!
Cute!
All done! I want to do this to the edge of my cardigans now, it’s so sweet ^_^
Hope you guys enjoyed and I hope Christina enjoys wearing them!
|


Want to download this tutorial in one handy file?
How To Use The L’Oreal Rowenta Steam Pod Hair Straightener – Violet LeBeaux
Today I’ll show you how I use my L’Oreal Rowenta Steam Pod to get super smooth straight hair. It’s totally awesome and doesn’t damage hair as much as a traditional straightener, I love it!
|
Here’s the text transcript: Hey Besties!! Shop: http://bit.ly/NknExz ~~~~~~~~~~~~ A blog and Youtube channel about a girl and her quest to make everything sparkle. New craft, hair and beauty tutorials every week! Violet LeBeaux spends most of her time trying to think of ways to make life prettier, posting said ways on her blog and drinking very strong tea. She writes about big hair cute things, girly fashion, beauty finds, sometimes Hime Gyaru fashion (姫ギャル) and crafty tutorials. She lives with her adorable boyfriend Jimmy, fluffy puppy Miss Lottie and Bergamot Bunny in Melbourne, Australia. ~~~~~~~~~~~~ Music: Garageband unless otherwise credited |
