Do you guys ever have cool ideas while you’re dreaming? It’s so weird but sometimes I actually wake up from half a dream and it’s given me an idea for a project!
That’s how I came to the idea of doing these stockings anyway!
They’re really rock styled but I love them and depending on the stockings you use and the colours you could do so many other versions for different styles!
So let’s get started!
You need:
Thick stockings
Thread
Scissors
Pins
You need some stockings to start with. The kind of stockings you use is very important, they need to have a very high denier and not be prone to running. The thicker the better!
Lay out the stockings flat on the floor.
Start by putting pins at even spaces down the side of the leg. The pins are where you will be cutting the bow shapes so make sure you have enough and space them as thick as you want the bows.
I did twice as many as shown in the photo for lots of bows.
Make small snips where the pins are. The longer the cuts are the more revealing the stockings will be. Remember that once they’re on your legs they tend to stretch so do less than you think you’ll need. You can always cut them bigger later but it’s harder to go backwards!
Now to make them into bow shapes. Take a piece of thread and push it through the first tab of the stockings.
Pull it tight and tie it in a knot. The tab will crumple up like a bow. If you want them to be exactly perfect you can pleat and stitch each one but that will take a very long time and really looks pretty much the same in the finished project.
Tie the thread tightly and knot it off. Cut any loose edges and you should have something like this:
Keep oing until you’ve done them all.
When the stocking is flattened out it should look like this:
If you are concerned about fraying and ladders a quick fit is to dot a tiny bit of clear nail polish at the corners where the ends of the cuts are. This will dry unnoticeable but will prevent anything from unraveling.
Try them on to make sure they fit and make the snips bigger if you want to!
When you’re all finished put them on and enjoy!
This is such a different style than I’m used to but it’s so much fun!
I think at the moment my casual style is leaning towards back and rockish.
While my dressy style is much more princessy.
Either way these were really easy to make and I look forward to trying some more different things to do with stockings soon!
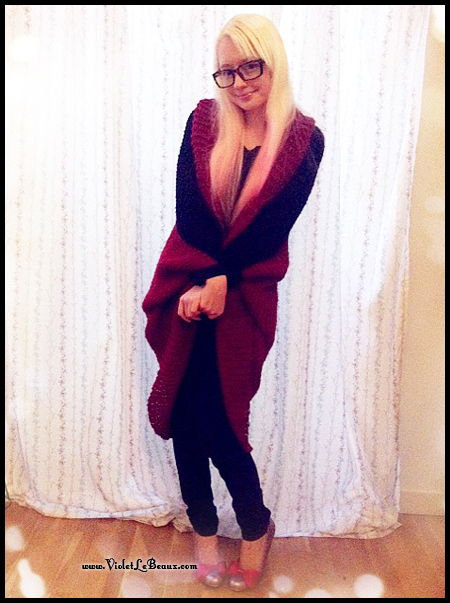
Dear Old Boring Black Cardigan With The Weird Sleeves That Make My Arms Look Dumb,
Please stop being so old and boring so I have more reason to wear you out.
Sincerely,
Violet.
Apparently writing letters to your clothing doesn’t actually work. Who knew?
So this is how I fixed that problem instead and turned Old Boring Black Cardigan into something which is a little more my style and a tiny bit Chanel inspired.
This is original old boring cardigan:You need:
Contrasting elastic
Needle/Thread/Sewing machine
Old boring cardigan
I thought about adding some other decorations but ended up sticking to something more classic.
First snip off all of the buttons.
Pin the elastic around the edge of the cardigan. Make sure to try it on so it all sits flat.
Stitch it in place along the side closest to the edge. I decided to just stitch the one edge so I could still use the button holes underneath. Fold the edges of the elastic over the bottom too so they are hidden.
Add two more strips of elastic horizontally like little fake pockets. Make sure to fold their edges over too so they’re not exposed.
Stitch in place. If you want you can stitch the buttons back in place too or just use a brooch to hold it closed. To fix the bunchy sleeve problem I re-hemmed the edges so they sat flat instead of being gathered.
Taadaa!
Cute and much more interesting than Old Boring Black Cardigan. Now it’s Exciting Awesome Classic Cardigan.
Dear Violet,
THX for making me over LOL. I’m glad you actually take me out of the cupboard now, let’s be BFFs 😀 😀 😀
Love,
<3<3<3<3<3 Awesome Classic Cardigan<3<3<3<3<3
Now if I could just teach the cardigan that text speak isn’t appropriate to use in letters. Baby steps…
Yay a sewing tutorial! I receive a lot of requests for sewing tutorials and I do want to do them but they take a lot more time to prepare and it can be hard to make patterns which actually resize to any body type and shape correctly.
So I thought we would start it off with the most basic skirt possible. There are no zippers, no overlocking, no buttons, no waist band sewing, no anything. As long as you can sew in a straight line you can make this skirt.
It’s great because it’s extremely versatile too, you can use this basic pattern for so many different types of skirt and styles. Make it longer for a basic Lolita style skirt, make it shorter and sit higher on the waist for the kind of Gyaru skirt that’s been in all the magazines recently, make several layers or ruffles for something more fairy kei. It all depends on fabric choice and how you decorate it.
Mine isn’t any particular style, just the bare basics so you can see the idea and run with it.
You need:
Fabric
Elastic for the waist
Lace for decoration
A sewing machine is recommended but you could hand sew this if you didn’t mind taking the extra time.
I used some left over fabric from curtains I made.
Measure a piece of elastic around where you want the skirt to sit on your waist. It should not be loose but not pulled either. Add another 3cm or so on to that measurement so it can easily overlap the ends. Make sure it’s stretchy enough that you can easily get it over your hips to put the skirt on and off.
Next cut two long rectangles of your fabric. It needs to be as long as you want the skirt plus around 5cm. The measurement on the long side should be minimum twice the length of the piece of elastic you cut earlier. You can make it even wider if you want, this will result in a more floofy ruffled skirt.
Place the bad sides of the fabric together and stitch down the short edge on one side. You should either fold the seam over again and stitch in place or zigzag stitch down the edge to prevent it from fraying later.
They should form one very long rectangle now when unfolded.
When scrunched to the same length of the elastic it should look like this.
Now we need to make it an even ruffle. Some machines have a ruffling foot and some people prefer to do this by hand.
The easiest way for a beginner to get an even ruffle is to use the gathering technique. Anchor the thread at one end of the side you want to ruffle. To anchor sew straight then reverse the stitch back up the line you made then continue down again the correct direction. This will prevent it unraveling later.
Sew a straight line right down it around 1cm from the top. When you get to the end, don’t anchor it and sew right off the edge.
Cut the threads to be quite long. Grab the top thread with your hand and gently push the end of the fabric away. It will begin to gather up on the thread. Keep pulling the thread and pushing the fabric until the gather is the length you need.
If you have weak thread I would suggest sewing two stitch lines to gather because it can be really frustrating to get almost to the end and have the thread snap!
Ok so you should gather the top so it’s as long as your elastic is when stretched out. To find this out, lay the fabric down and stretch the elastic with your hands over the top, if they’re roughly the same length you’re good to move on to the next step.
Now we need to sew the fabric and elastic together. Place the gathered end of the fabric (right side up) on top of the end of the elastic. Anchor them together with a couple of stitches.
As you sew them together you should use one hand to stretch the elastic out under the gathered fabric. It can be a little tricky to get the hang of but I find this gives a much better result that zigzaging unstretched as some people prefer.
Try to keep your stitching as straight as possible but don’t stress too much because this will all be covered later.
You should have just enough fabric to go the length of the stretched elastic so stitch to the end and tie off.
So now you’ve got a big long ruffle attached to a piece of elastic.
At this point you want to pull out the gathering thread you used because it should all be securely on the elastic now!
Up close the raw edges look pretty crappy so we’ll hide them now
The easiest way to do this is to take a piece of lace and stitch it on either side of the raw edge. The top stitch line is on the elastic and the bottom is on the gathered fabric.
You want to stretch the elastic out as you go again so the lace will ruffle up when it’s unstretched. Sew on either side on the lace and you’ll end up with something like this:
See that the ends of the fabric are totally incased? That will help prevent fraying so the skirt will last longer.
Now we need to finish off the bottom of the skirt. I had some left over lace so I folded the bottom of the fabric over to create a seam and stitched the lace on too. You can add anything you like here which fits the style you’re aiming for. Just make sure you either zigzag the edge of the fabric or fold the seam over twice so the edge is encased that way it won’t all come undone in the wash!
Now all you need to do is sew down the side and it’s finished! Fold the skirt in half with the good side in. Stitch down the side starting from the elastic and moving to the bottom seam. Make sure it all matches up well otherwise you’ll get an odd shaped skirt. Either zigzag down this edge too or fold again and stitch so it’s not exposed.
Turn it around the right way and you’re all finished!
Now you have a cute skirt and the know how to make one in any style you like!
See I told you it wasn’t that hard!
Very easy once you get the hang of it so you can make them quickly!
Of course keep in mind that if you made yours out of curtains like I did you should probably avoid taking your photos in front of the same curtains or else you will suddenly have the awesome ability to camouflage!
POWERS ACTIVATE!!!
Fail. Either way I hope you enjoyed the tutorial and let me know how you go with it! Can’t wait to see what you guys make!
I am asked very often to do absolute beginners tutorials on things like sewing, crochet and knitting. I definitely want to do all of these in the long run but they are posts which take quite a bit of time to put together as they require a lot more instruction than regular tutorials.
Considering how long it’s taken me to get to this point I thought I would point you guys to some links which might be useful in the mean time. Many of these are quite popular sites but hopefully they can be a good start ^_^
Free Vintage Crochet Lots of patterns but as the title says, all from vintage magazines and books. This site is full of annoying pop up ads but some of the patterns are worth it because it can be hard to actually find vintage styles like this any more.
Coats & Clark I’m pretty sure this is another yarn company but their section of free projects is pretty good.
Lionbrand Heaps of free crochet patterns here too. They also have a handy thing which converts the crochet patterns to knitting and vice versa.
Lionbrand, Glossary of Terms Used
One of the bigger yarn companies (though I don’t think you can get it in Aus!) has easy to follow instructions.
Websites with free knitting patterns…
Knitting Pattern Central Same as the crochet version of this site there are heaps and heaps of free patterns divided by type.
Vogue Knitting Vogue has had a knitting version/sections for as long as I can remember. The patterns are quite varied and worth a look but you need to sign u to download them.
Nerdy Knitting Exactly what the title says, a collection of nerdy themed knitting projects. It’s on Livejournal so you may need and account to view I’m not sure.
Knitty Magazine Knitty is an online magazine full of tutorials and patterns. All of the previous patterns and issues are online too and it’s totally worth trawling through them because there are some real gems. There’s a bit of everything from regular shawls and cardigans to crazy stuff like knitted wigs for Halloween.
Lionbrand Heaps of free knitting patterns here too. They also have a handy thing which converts the knitting patterns to crochet and vice versa.
Sewing:
Learn to sew…
Free Needle Lots of basic beginners tutorials as well as covering the basic pattern making concepts.
Sew Stitch Learn Basic techniques including ruffles, bows and zippers. Lots of good information with clear photos. Good information on sewing machines and the technicalities about it.
Cyber Seams Information about sewing by hand, Very important skill because machines aren’t always available or appropriate.
About.com – Sewing Again, hate the layout but there are some good beginners tips here.
Websites with free sewing patterns…
Simplicity Patterns One of the largest pattern companies, they also offer many free tutorials and patterns on their website. There are tutorials on sewing techniques as well as actual free patterns.
Lolita Handbook patterns I know a lot of you are into Lolita styles so I’ve included some links here. Many of these can be modified into other styles including Hime Gyaru with a few changes. This link gives some basic sewing advice and a couple of tutorials.
Avant Gauche Sewing Another Lolita link, this is a collection of commercial patterns which could be used for Lolita styled clothing.
Burda Style Another big commercial pattern maker, Burda have a section where you can submit your own patterns as well. You can see lots of other people’s tutorials.
Thread Banger Youtube channel which has some interesting sewing and diy ideas.
Freeneeedle A collection of links to various blogs which have sewing and diy tutorials. It can be a bit of a gamble clicking as there are no preview images but there are so many patterns you could spend hours doing it.
Inspiration and communities:
Craftster Massive crafting forums. Everyone is very friendly and all crafts are welcome. I always mean to post more on my account here and never have time to ;_;
Ravelry Knitting community! Invite only but signing up only takes a few minutes so it’s worth it. There are heaps of free and paid patterns as well as a massive library of yarns. You can also keep track of all of your projects and how far complete you are.
Pinterest If you’re on here you should totally add me! Anyway, you can find pretty much any craft imaginable as well as keep track of future projects you want to do.
CraftGawker Similar to Pinterest though they moderate all submissions so only the prettiest things get in. Again you can save favorites and click through to the full tutorial etc. Lots of pretty eye candy and full of tutorials.
Etsy This is the place to go for supplies and to buy other people’s crafts for sale. If you ever decide you want to sell your work this is a good place to start. Remember to check whether patterns you use are available for commercial use though. For example mine are available for personal use only so you can’t sell products made from my patterns.
Deviantart This is another community for artists, the Artisian Crafts section is huge and there are lots of knitting/sewing/crochet groups. If you’re into cosplay there are lots of groups and tutorials too.
So hopefully they are useful and will keep you going for a little while longer!
If you have any awesome sites of suggestions just let me know in the comments and I’ll add them. I’m considering maybe putting together a bigger list of tutorials so if you guys have written any you can submit them. What do you think? Would that be useful?
So remember when I made that big blue batwing style cardigan? And it was not bad but I wanted to try it out with a knitted fabric to give it a better drape?
While I was cleaning out our cupboards I found what I was planning to make it out of:
Back when we lived in Brisbane I spent months knitting these big blankets to use as throw rugs on our couches. When we moved they got shoved in the cupboard and eventually made their way to Melbourne with us. They probably would have actually been useful here with us having a real winter but I forgot about them completely so they lived in space bags until now!I used the same technique as last time, folding the corners in together to make the sleeves. The blanket was longer than it was wide so that made it a bit trickier.
I used a yarn needle to stitch it all together evenly.
The shape and fact that there was a thinner red stripe at one end actually make it a lot more jumper like because when laid out it naturally formed a folded collar. Totally looks like I planned it 😉 … which I totally did if anyone asks…
So there you go! I prefer this one to the blue one because it drapes beautifully and I really like chunky knits. The only problem I have is that it’s not quite wide enough so I might knit on some longer sleeves if I can find some matching yarn again.
Ugh that reminds me that I need to go through my yarn stash… it’s getting out of control and I haven’t made anything for ages!
You know how I’ve been having that whole wardrobe clean out thing? Well it continues as I try to change up some older clothes instead of throwing them out 😀
Today I thought I’d show how I turned a knitted dress into a comfy nordic poncho. I really loved this dress but it just never looked right on me 🙁 Something about the lack of waist and slight curved line in the bottom that just made me look odd. But I love the print so I couldn’t let it go just yet XD
First thing, a note about working with knitted fabrics like this, be VERY careful. Honestly don’t cut knitted fabric unless you’re going to be very quick in sewing it back up otherwise you will find things unravelling. You will need to either overlock all of the seams or you should use a princess seaming technique to seal in all raw edges completely.So, to turn the dress into a poncho, the first thing I did was snip off the side seams.
I folded the bottom up to work out how long the end result would be.
And snipped it off 😀
Then snipped it in half again..
… to make big sleeves!
I trimmed so it all fit together well.
Then started sewing up the seams.
All the pieces laid out look like this:
Sewn together and seamed:
To top it off I added some tassels to the edge out of left over yarn. Easy!
It’s nice and warm for the current season and now at least I can wear it!
What do you guys think? Do you prefer stuff like this or completely done from scratch clothes?
Illustrator. Strong tea, knitting, watercolours, and making a video game called Moonlight in Garland. Living with her adorable husband Jimmy, fluffy puppy Miss Lottie and Bergamot Bunny in Melbourne, Australia.
By continuing to use the site, you agree to the use of cookies. more information
The cookie settings on this website are set to "allow cookies" to give you the best browsing experience possible. If you continue to use this website without changing your cookie settings or you click "Accept" below then you are consenting to this.


![photo[1]](https://i1.wp.com/www.violetlebeaux.com/gallery/albums/Tutorials%20and%20Craft/batwing-cardigan-from-blanket/photo-1-.jpg "photo[1]")

![photo[2]](https://i1.wp.com/www.violetlebeaux.com/gallery/albums/Tutorials%20and%20Craft/batwing-cardigan-from-blanket/photo-2-.jpg "photo[2]")


