Mini camera diy… I love having my camera on a neck strap but sometimes it a pain having it in the way when I’m using the wrist strap.
A couple of lanyards later…And the camera soon has it’s own removable straps.
Done!
I found this really useful but to be honest it was annoying as hell having to listen to the metal clips jingle against the metal sides of the camera so I gave in and put the regular strap back on >_< I will find a solution to this though!
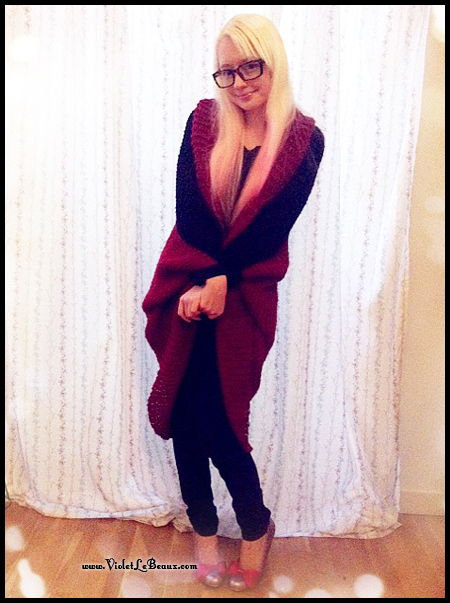
So remember when I made that big blue batwing style cardigan? And it was not bad but I wanted to try it out with a knitted fabric to give it a better drape?
While I was cleaning out our cupboards I found what I was planning to make it out of:
Back when we lived in Brisbane I spent months knitting these big blankets to use as throw rugs on our couches. When we moved they got shoved in the cupboard and eventually made their way to Melbourne with us. They probably would have actually been useful here with us having a real winter but I forgot about them completely so they lived in space bags until now!I used the same technique as last time, folding the corners in together to make the sleeves. The blanket was longer than it was wide so that made it a bit trickier.
I used a yarn needle to stitch it all together evenly.
The shape and fact that there was a thinner red stripe at one end actually make it a lot more jumper like because when laid out it naturally formed a folded collar. Totally looks like I planned it 😉 … which I totally did if anyone asks…
So there you go! I prefer this one to the blue one because it drapes beautifully and I really like chunky knits. The only problem I have is that it’s not quite wide enough so I might knit on some longer sleeves if I can find some matching yarn again.
Ugh that reminds me that I need to go through my yarn stash… it’s getting out of control and I haven’t made anything for ages!
This is the story of how I made our new headboard out of $7 of plastic sheeting and some pillows.
Now it looks like this 😀 😀 😀
And before it looked like this…
No Home Sweet Home page, I’m really behind on those >_<So my old bed was ok but it really didn’t match the rest of the changes I’d made to the bedroom. Meeeeh.
You need:
Plastic board, I used 4 sheets
Pillow cases/fabric
Stuffing/old pillow
Buttons
Glue gun
We rent so obviously I couldn’t screw anything to the walls nor could I afford a new bed frame so instead I made one that just slotted in.
This is the kind of plastic board I used, it was from Bunnings.
I taped it all together into one big piece.
And cut it down so it was the right width and height to slot in behind the bed.
Then James and I sat down on the bed and traced around ourselves to work out how big I needed to make the curve so we could still lean on it comfortably.
We filled them in to be terrible drawings of ourselves… because we’re awesome.
Then we added in some love messages because we’re smoopy like that. And now when I lean against the headboard I always think about how much I love him!
So classy!
Aaaaaaanyway….
I drew on the design of the headboard making sure to leave room for James’ abs.
And the other side too.
Then I cut it out.
To save time later I drew the placement of where the buttons would eventually go. To make sure they were even I made a grid with a fancy thing called a ruler 😀
Then I poked holes through with a pair of scissors.
Now for the design! We managed to get a doona (duvet) cover for $40 on sale at Target and it came with pillow cases. I wanted different pillow cases so I decided to use them on the headboard instead. Luckily the pattern matched up.
I opened them out so there was enough fabric to cover the whole thing. It didn’t reach the bottom but that really didn’t matter because it would be covered up by the actual bed.
Now it was time for the fun part: pillow stuffing.
I emptied an old pillow all over the plastic.
And hot glued it in place. I didn’t have too much stuffing so when I have money for more I’ll be buying some and opening it up and restuffing.
Kinda looks like a big cloud 😀
Once it was fluffy I laid out the fabric and hot glued it along the bottom to the plastic.
I then made sure there were no wrinkles and slowly went around the edge hot gluing it around the back side. It was very important to pull it tight. It was also important not to burn myself. I only managed to do one of those things though.
While gluing the edges I made sure to put stuffing over them too so the fabric didn’t show the sharp edges of the plastic.
Taadaaa…
It started looking more like something useful at this point! And James said he doubted I could make it work!!!
And the back. I reinforced it with some off cuts to make sure it didn’t bend.
Close ups of glue…
And this is it slotted in the bed:
The last step is to add in the buttons. At first I tried to make my own buttons by covering more plastic but that was extremely tedious so instead I got off my butt and bought some nicer ones 😀
To hold them in place at the back I used some cardboard off cuts cut like this. I threaded each button, stitched it through the hole leaving the ends both out the back of the hole then tied them around the piece of cardboard so they were kept in place. Hard to explain but it works. It’s very important to keep the buttons as tight as possible so they make nice dents in the fabric.
Like this:
The buttons pucker the fabric through the padding.
And that’s it!
I am extremely happy with how this turned out. While it’s not the most professional thing in the world it brightens the room up beautifully, matches all my new decorating and it was extremely cheap.
What do you guys think? I think the Home Sweet Home project is starting to come along nicely~
Here’s the little scottie dog I made and below it I’ll show you how I made a little bunny charm.
Heehee with the fox so cute!So here’s the finished charm, I originally got the idea for a charm like this from a video on youtube which (even though I spent a long time looking today) I can longer find, the girl made a really pretty necklace out of needle felted balls and flowers. If you’ve happened to see the video please send me the link so I can add it here! *Edit* Reece let me know the video is here! YAY! http://www.youtube.com/watch?v=pgqWY0aYVFA
I really love felting when it’s incorporated into jewellery with other mediums.
Start with a ball of green, I mixed a couple of greens for the one I wanted.
I made it small enough to fit snugly into the little plastic base.
And hot glued it firmly.
Then it was just a matter of adding a design. I chose a bunny because… well they’re damn cute!
It took me a while to understand how to shape it well but now I want to try more felting embroidery like this.
Some little flowers around the bunny and that’s it! Now it just needs a brooch backing or something similar.
Of course the downside of this craft is that everything even remotely close to it looks furry like this.
So if you don’t separate the roving properly you’ll be breathing in fibre all night >_< Totally worth the time to be gentle for the best results because it’s such a cute craft!
This shoe make over was a multi step process, in fact it took me around a month of doing part of it then forgetting the rest to actually complete them!
Worth it thought because they are pretty damn cute!
This is how they started out life:
They were cast offs from my Mum who bought them but decided they didn’t fit very well. I’m not so big on snake skin pattens or brown so I thought I could use them to experiment with new ideas. They were completed in 3 steps: 1. Painting 2. Glitter Soles 3. Decoration.You need:
Shoes
Fabric paint/puff paint
Glitter
PVA or fabric glue
Paint brush
Ribbon
Hot glue
First thing to do is paint the entire shoe. I decided to try out puff paint that I had left over from window decorations.
It worked really well but took several coats.
Having such a sheer colour was actually good because it was easy to get the colour I wanted. The snake skin pattern still showed through in a really interesting way too so I didn’t keep going to make it opaque. I used 3 coats and left it to dry overnight between each. Next up the glitter soles. These techniques have been all over the internet recently and Wookie Wife did a fantastic version of it over on her blog with bright blue glitter that looks amazing! Anyway the basic idea is the same thing I did with the red glitter sneakers except that I was out of PVA so I used fabric glue. Add the glitter to a container and add a good helping of glue. The more glitter you use the longer it will take to dry but the less coats you have to do. Mix it all into a paste. Paint the paste all over the soles of your shoes! You can tape off the edges if you want but it’s fairly easy to stay in the lines. When it’s dry it looks like this… You can do the entire sole if you want but I figured it was a bit of a waste of glitter and I wanted to keep as much grip on the toes as possible because they are slightly too big for me already. Obviously you need to do the other shoe too XD Now this step is important. Both the fabric glue and the pink puff pant dry with a slightly sticky texture, if you don’t seal them in somehow they will pick up every speck of dirt on the streets and the finish will become darker and dull. To get in before the dirt does just lightly dust them with some translucent make up finishing powder. I used a make up brush that I was planning on washing that night anyway. Because it’s translucent it doesn’t dull the finish at all but it protects them from having dirt stick there. Now they’re pretty cute but they needed something else. I decided to use up some thick ribbon that came on a present. A couple of bows and some hot glue later they were finished! I have to say they have come pretty damn far from their original form and I love them! They are low enough to be comfy and the pattern showing through the pink makes them so much more interesting! What do you guys think?
The time is finally here, the Bergamot Etsy store is finally open!
Such a relief to finally have something online! The store will have several more options added over the next few weeks but at the moment it has:
Cell phone and bag charms
Bracelets
Earrings
Plain charms that you can use in your own craft projects
Miss Bergamot herself:
It’s been a really bumpy ride trying to get this up and running, working out margins including several currency exchanges and percentages has reminded me several times why James and I are considering moving overseas >_<
I’m so proud of how this batch of charms has turned out and it’s made all of the hard work worth it! The next step is definitely still getting the plushies into production but my negotiations on that level are still going on and until I can get the costs including shipping under control without me having to lay out many thousands of dollars in advance it’s slow progress. But it is progress so it’s something else to look forward to!
In the mean time I will be putting a couple of the handmade Bergamot plushies up for auction!
I’m so happy to be able to keep crossing big projects like this off my to do list! Next step will be the Bergamot book and the pattern books 😀
Illustrator. Strong tea, knitting, watercolours, and making a video game called Moonlight in Garland. Living with her adorable husband Jimmy, fluffy puppy Miss Lottie and Bergamot Bunny in Melbourne, Australia.


![photo[1]](https://i1.wp.com/www.violetlebeaux.com/gallery/albums/Tutorials%20and%20Craft/batwing-cardigan-from-blanket/photo-1-.jpg "photo[1]")

![photo[2]](https://i1.wp.com/www.violetlebeaux.com/gallery/albums/Tutorials%20and%20Craft/batwing-cardigan-from-blanket/photo-2-.jpg "photo[2]")


![photo[2]](https://i2.wp.com/www.violetlebeaux.com/gallery/albums/Tutorials%20and%20Craft/needle-felting2/photo-2-.jpg "photo[2]")


![photo[1]](https://i1.wp.com/www.violetlebeaux.com/gallery/albums/Tutorials%20and%20Craft/needle-felting2/photo-1-.jpg "photo[1]")


