How To Make A Woven Laptop or iPad Case

I love working with pretty yarn and I love knitting and crochet but not everyone has those skills so I sometimes hesitate posting tutorials that need those skills here… but I still love working with yarn so I try to do other techniques that use it. Things like the heart and strawberry shaped pompoms, no knit yarn strawberries etc are really fun to do and don’t take much skill at all 😀

With that in mind today I’ll show you how I made a simple woven slip cover for my ipad. You could use this same technique for a laptop, phone or anything really!

Woven Laptop and iPad Case Tutorial

What you need:

  • Yarn
  • Scissors
  • Whatever you’re making the case for, I’m using my iPad (yay for early birthday presents!)

Woven Laptop and iPad Case Tutorial

I wanted to get this done quite quickly so I decided to use this really thick squishy yarn, it’s super soft and kind of looks like a big rainbow pipe cleaner. If you use thin yarn it will take longer to put it all together and weave tight enough to avoid holes. Whatever you use the technique is the same.

Woven Laptop and iPad Case Tutorial

So grab one end of the yarn and tie it around the ipad/laptop. Knot it in place so it doesn’t move. Don’t do this too tightly because you want the gadget to be able to slide in and out of the case easily.

Woven Laptop and iPad Case Tutorial

Next keep wrapping the yarn around in a big spiral so it forms several straight lines across the ipad. Tie the last loop to itself so the whole thing doesn’t come undone.

Woven Laptop and iPad Case Tutorial

Now the case I made has a fancy end part which is woven in a different direction to the bottom, if you want to do that then you can cut the extra yarn off but if you want to have the whole thing woven in the same direction leave it attached. The reason for this is that when you weave it all together it will compact and it won’t be long enough to encase the whole ipad anymore so it’s easier to just work with it in two sections.

Woven Laptop and iPad Case Tutorial

Next it’s time to measure out the cross pieces, if you’re doing the fancy end weaving you want them to be around 3-4 times as long as the gadget so there is lots of room for mistakes. If you just want it to do regular weaving then 3 times as long should be fine.  Folded in half mine was this long:

Woven Laptop and iPad Case Tutorial

Cut a *heap* of them. I needed about 3 times as many as shown here to do the whole case. In fact I used a whole ball of yarn for this project.

Woven Laptop and iPad Case Tutorial

So let’s get to the actual weaving part. Take one of your lengths of yarn and start weaving it horizontally across under, over, under, over, under, over etc until you reach the other side.

Woven Laptop and iPad Case Tutorial

Do the same with another piece but if you started by going under, this time start by going over. It should be the opposite to the pattern you did with the first yarn.

Woven Laptop and iPad Case Tutorial

Close up you can see what I mean.

Woven Laptop and iPad Case Tutorial

At the end, take the two pieces of yarn and wrap them over the end of the gadget.

Woven Laptop and iPad Case Tutorial

… and continue the weaving pattern over the back. if you ended on an “over” on the front then make sure to start on an “under” on the back to keep the pattern going. Also make sure the loose ends on the yarn are roughly the same length so we can use them later.

Woven Laptop and iPad Case Tutorial

Now go crazy with the weaving! I did about half of them on one side working form the middle to the edge then flipped it and continued them on the back.

Woven Laptop and iPad Case Tutorial

At around this point its a good idea to add a couple of cross yarn lengths to the bottom so it strengthens it a bit more.

Woven Laptop and iPad Case Tutorial

All I did was cut 2 more lengths of yarn and just weave them into the bottom from left to right.

Woven Laptop and iPad Case Tutorial

I knotted them and left the ends loose so I could knot them with the yarn on the sides to form more sturdy corners.

Woven Laptop and iPad Case Tutorial

The sides need to have a nice tight weave to protect the ipad/laptop/whatever from damage so when you get to that point make sure the yarn is very close together.

Woven Laptop and iPad Case Tutorial

In the photo below you can still see gaps so it’s best to add another strand or two just to be on the safe side!

Woven Laptop and iPad Case Tutorial

Repeat the process until the whole thing is covered nice and tightly. You can see that by pushing the strands together tightly to form the fabric the whole thing has shrunk leaving around 1/3rd of the ipad exposed. At this point if you want to keep the straight weave all you need to do is move the case a little further down the gadget so you have room to wrap around another lot of vertical strings to weave the ends in to. Keep going in this way until it’s as long as you want 😀

Woven Laptop and iPad Case Tutorial

I decided I wanted something a little more decorative at the ends so what I did was tie each pair of end strings into a knot. Then from each pair I pointed one diagonally right and one diagonally left. Having them all pointed at an angle like than made it very easy to weave them together. Same concept as before: over/under/over/under etc but on an angle.

Woven Laptop and iPad Case Tutorial

I kept doing it around the edge, slowly getting them all into place. Once it was long enough I broke them into pairs again and double knotted all of the ends together to prevent it from just coming undone.

Woven Laptop and iPad Case Tutorial

At that point it looked like this… Woven Laptop and iPad Case Tutorial

I trimmed all the ends down so they were even but I left them around 5cm long to make a kind of frill at the end. Lastly I just pushed the couple of loose ends from the bottom corners in.

Woven Laptop and iPad Case Tutorial

All finished!

Woven Laptop and iPad Case Tutorial

And that it, the techniques can seem a bit complicated at first but once you get the basic idea down you can make pretty much anything. The fact that you’re actually weaving onto your ipad/laptop/whatever means you know it’s going to be a perfect fit every time. Easy! ^_^

Violet's Storage Ideas – Wardrobe Reorganised

So a while ago I made a post about my wardrobe and some storage ideas for people living in small apartments with lots of stuff. I said if enough people were interested I would make it into a series of posts and go through room by room showing what I’d done with my space. Well I finally cleaned up enough to take some photos hahaha! As I mentioned in the last post I’m not completely comfortable having my whole house on display so I have blacked out some parts and there won’t be whole room shots, just smaller areas where you can actually see the storage and ideas I’ve used.

This is what the wardrobe looked liked last time…

Storage Ideas

And after I’ve done a re-organize and tidy up, this is what it looks like now…

Violet's Random Storage Ideas

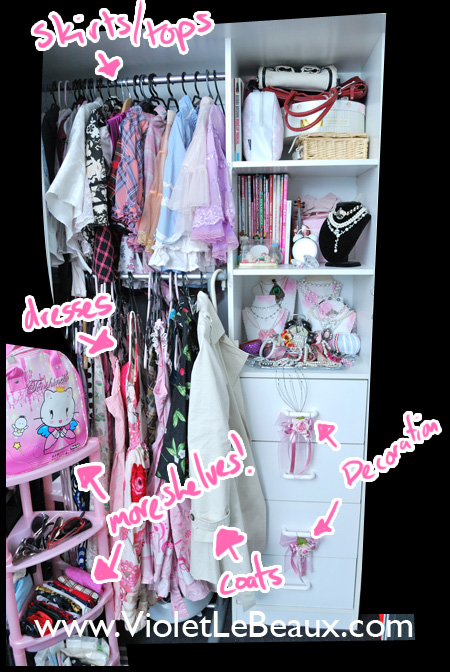
Other than the general moving/tidying/reorganising of things the biggest difference is that I’ve got a little pink set of shelves at the bottom left now to make things tidier. You probably can’t even tell but I’ve removed around half of the clothes that were hanging up as well and put them on some other shelves I bought. I’ll go over all of the shelves in much more detail in the next post and today I’ll focus on the wardrobe part and why I’ve made the changes.The one thing to point out on the clothes side of the wardrobe is that it originally only had the higher of the two rails, I added in the second one because the first is so high that I have trouble reaching it easily… also I horde clothes like crazy and needed more room XD

Violet's Random Storage Ideas

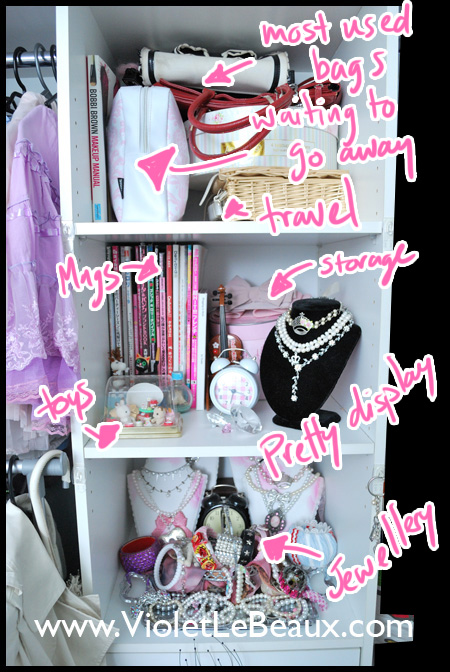
The above shelves are generally the same as last time but there are some important differences. Here’s a quick run down of what’s in each:

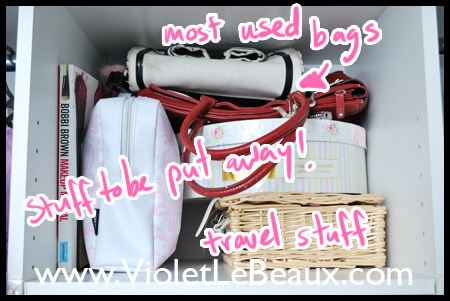
  • Top Shelf- Bags I use regularly, travel things (like passport holder and travel make up brushes etc), books I’ve recently read which need to be put away, other things waiting to be put away or things waiting to be used.
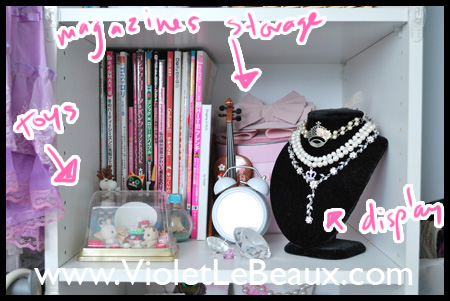
  • Middle Shelf- Magazines, toys, favorite jewellery, storage.
  • Bottom Shelf- Jewellery and lots of it.

Violet's Random Storage Ideas

Top shelf-

Previously the top shelf was all about bags which at the time seemed smart because I could display all of the pretty ones I never used. Problem with that was I had no where to dump stuff when there was no time to get out a chair to put it away properly. So it all ended up on the floor which resulted in a lot of mess and more than one foot injury from stepping on something pointy!

I realised the I never use any of my handbags other than maybe 2 of them so rather than wasting the space I took a photo of them all and bundled them all up in a space bag. That way if I really need one I can check the photo, see what matches my outfit then get it down. I’m far too lazy to change bags often so this works well for me 😀

Now I have an area that I can stick books/recently used bags/stuff waiting to be crafted into something else/random junk that I don’t have time to put away in until I have time to deal with it properly. I think having a dumping space like this is important for someone messy like me so the rest of the room doesn’t get too overrun XD

Violet's Random Storage Ideas

Middle shelf-

The things here are pretty much the same as before, lots of magazines, necklace display, toys etc. The biggest difference is that I found a little plastic container to  to contain my toys in a display. Before, whenever I wanted to get a magazine I had to carefully reach through so as not to disturb them but now there’s no problem and I also don’t have a fear of losing any of the little tiny pieces. I know you can buy little display cases like this specifically for toys but I didn’t want to spend any money so I used the container that a free hand towel from my favorite bubble tea place came in XD Perfect size and shape!

Violet's Random Storage Ideas

Bottom Shelf-

This is where the biggest changes have happened. Previously I kept socks, gloves, scarves and a lot of other stuff on this shelf and it worked really well. Now I have other areas for those things so I don’t need to have everything squished in as hard.

So what I did was remove all of the socks etc at the back and move the necklace displays over there so I can see at a glance what they hold. The back ones are propped up on a couple of books so they sit higher and are able to be seen. In front I have a decorative alarm clock James bought for photo shoots and the silver tray. On top of the tray there is a silver basket type of thing that we found in the throw away pile of our apartment building which I covered with a scarf and filled up with bracelets and random pieces of jewellery. It looks pretty cluttered and messy in the photo but I think that’s just the angle, it’s actually just above waist height in real life so when you look down it’s easy to get a quick view of all the pieces and pick out one.

So there you have it! Those are the changes I’ve made so far in my wardrobe area, the next installment of this series will be my dressing table. There are LOTS of sparkly pretty things there to look forward to and my nail polish collection as well ^_^

How to Repair an Elastic Skirt Waist

Continuing on the idea of remaking and reworking old clothes into better versions of themselves today I’m posting a quick easy fix I did for a skirt given to me by Celeste. It was super cute and had nothing wrong with it other than the fact the elastic was crunched up and a bit past it’s used by date.

Quick fix: replace the elastic.

What you need:

  • The skirt in question
  • Flat, thick elastic, same size as is in the skirt already so it fits in the channel
  • Scissors
  • Needle and thread

Replacing an Elastic Skirt Waist Tutorial

In most elastic waisted skirts the top is a band which encases the elastic and allows the fabric to bunch up when the elastic is not stretched. In that section there is generally a vertical size seam which will allow easy access to the elastic once you snip the stitches. Locate it and using a very small pair of scissors carefully cut the stitches making sure not to cut or damage the fabric around it.Replacing an Elastic Skirt Waist TutorialThrough the hole you should be able to pull out the elastic. See how it’s all twisted and crinkly?

Replacing an Elastic Skirt Waist Tutorial

Cut the loop of elastic so you have two ends hanging out of the hole. Take your new piece of elastic and roughly stitch it to one of the ends of the old elastic. You could also use a safety pin to pin them together if you have one handy.

Replacing an Elastic Skirt Waist Tutorial

Now carefully pull the old end of elastic (the one that’s NOT attached to the new elastic) out of hole in the skirt. What should happen is that as you pull, it will drag the other end of the elastic through and around the casing and it will bring the new elastic through with it. You might need to be fairly delicate pulling it so you don’t damage the hole in the fabric and it doesn’t catch on the inside.

Replacing an Elastic Skirt Waist Tutorial

Keep feeding it through and pulling until the good elastic is all the way through. Then detach the good from the bad and sew the two ends of the good together. Make sure they are the correct way around so the whole waist band is flat, you don’t want to have a twisted waist and have to redo it :S Once you’ve stitched them together, push the whole thing back into the skirt band and flatten it out, you should be able to do this by holding the waist from the inside with your thumbs and gently stretching it out so the fabric settles around it.

Replacing an Elastic Skirt Waist Tutorial

Stitch back up the hole with the needle and thread.

Replacing an Elastic Skirt Waist Tutorial

Done! Now it’s as good as new and has a nice flat (and much more flattering) waist 😀

Replacing an Elastic Skirt Waist Tutorial

So this took about 15 minutes to do and saved a perfectly cute skirt ^_^

Replacing an Elastic Skirt Waist Tutorial

By continuing to use the site, you agree to the use of cookies. more information

The cookie settings on this website are set to "allow cookies" to give you the best browsing experience possible. If you continue to use this website without changing your cookie settings or you click "Accept" below then you are consenting to this.

Close