

How To Tie A Silk Scarf Into A Rose
Quite some time ago I posted about this silk scarf that I had made to wear as a rose on my bag. A lot of the comments asked how to tie it in the rose shape so here we go!

|
First, you need to actually tie it around something, when I’m putting it on my bag I use the handle but in this tutorial I’m using a lamp because it was the right height. You could also do this using your hair as the part to tie it to or anything really. So start by grabbing one corner of the scarf.
Tie it in a knot around your item leaving the corner hanging out to form a leaf. This will be tied one more time at the end so make the leaf a little longer than you want the end result to be.
Take the rest of the scarf and twist it fairly tightly.
Wrap it around the centre knot to form a spiral.
When you have wrapped most of it and only have a little left, tie the end in a knot with the first leaf you made so it forms the second leaf. All done!
But how does this work on a scarf which wasn’t specifically designed to be the colours of a flower?
Again start with the corner.
Tie in a knot around the bag handle/hair/whatever
Twist the end.
Twist into a spiral to form the rose. This scarf was huge so I had to twist it tightly in the middle and a little looser to make a nice rose.
Looser towards the ends.
And knot the ends together so it stays in place.
Rose done! It still looks really cute! This style works the best with scarves that are one colour along the edges and one in the middle as it forms the leaves better but plain or patterned silk scarves still looks great.
There you have it! You could also use this to decorate gifts, for example if you are giving someone a bottle of something you could tie a scarf to the neck and now it’s two gifts in one!
Let me know if you give it a try and what you wear it on!
|


Want to download this tutorial in one handy file?

DIY Painted Purse Make Over – Tutorial
Today’s craft is a mini purse make over. I wanted a little bag to take in my purse while we were traveling but nothing I had really went with the other stuff I was taking so I decided to give this bag a last minute make over. Why I always decide to do these things right before we leave I just don’t know… but yay for the end result anyway?

|
This was the old version. It used to have a deco Hello Kitty face on it but that fell off quite some time ago… quality craftsmanship!
First I painted it white using acrylic paint.
Then I painted it pink using some fabric paint I had left over from another project.
Lastly I cut out the old zips and added in my own zip. It wasn’t quite long enough so I used ribbon to disguise the gap.
Bam! Way cuter.
Probably not the smartest way to spend the day before you are supposed to leave on holidays but you know, I’m not that great at relaxing anyway.
Now that I know this method works I’m eyeing off some other old cosmetic bags I have… |


How To Make A Chain And Pearl Necklace – Tutorial
I go through phases of obsession with particular styles and at the moment the obsession is gold. Particularly chain and especially so if paired with pearls. I don’t have much gold jewellery so I set about making myself something which was dangly and could be worn a whole lot of difference ways so I didn’t need to clutter my already way over full jewellery area.
This is what I ended up with:

|
You need:
Cut a long length of wire. I cut mine to be able to wrap around my neck just over 3 times.
Add a clasp to the ends so you can easily take it on and off. I prefer lobster clasps. Work out how many pearls you want to attach and put each one on one of those wire findings which has a loop on each end. I don’t know what they’re called but see the photo!
Attach the pearls with jump rings evenly along the length of the chain. I also attached other jump rings with little spring findings between them.
I wanted mine to be super dangly so I also added another jump ring to the other end of each pearl.
Then just decide how full you want it to be and keep adding pearls, jump rings and findings randomly until it looks right.
Done! At this length you can wear it in a single, double or triple wrap necklace. You can also use it as a bracelet.
Or as a decoration for a handbag!
The possibilities are endless, you could easily thread it through your hair, use as a belt or use as a headband as well. Having the base as a chain and a lobster claw clasp means you can clip it to any length. My current favourite is just as a nice long necklace!
Hope you enjoyed and let me know if you give it a try!
|


Want to download this tutorial in one handy file?
Stripy Knitted Neckerchief Tutorial
Neckerchiefs! I love them! Knitted neckerchief is really hard to type without wanting to spell it knitted kneckerchief…
But back on track, for today’s project let’s make a stripy knitted neckerchief! This design and length is great because it can double as an usamimi. Winner!

|
You need:
Start by knitting a triangle of the first colour. Do this by starting with one stitch and increasing one stitch at the beginning of each row until you have 12 stitches on the needle. Knit this in a stockinette stitch. Change colours and then knit for 10 rows.
Change colours, knit for 10 rows etc until it’s long enough to go around your neck and down the other side. Decrease one stitch every row until you have one stitch on the needle. I think it’s nice to end on the same colour you started. Do not change colours or tie off. Now increase one stitch every row until you have 13 again and continue making stripes in each colour until it’s as long as the first half you made. Decrease every row until you have one left and tie off.
So what you want to have is a really long snake with two pointy ends and a thinner part in the middle. You should be able to fold it in half and have them match up perfectly.
So fold it in half and stitch around the edges. I found the easiest way to do it was to use a crochet hook and single crochet around the edge to seal the two pieces together. You could also easily blanket stitch. I chose to do it in the lighter cream colour but contrasting would be cute too. Now here’s the important part. When you reach the end you want to skip stitching the two halves together for one square of colour. I continued crocheting past that square but I just did it to the top piece rather than stitching them together. Stitch all the way around the other side and again make sure that you skip the same square on the other side. What you will end up with is a hole you can poke through:
Easy!
So all you need to do to wear it is poke one end through that hole to form a big loop!
Like this!
Yay! Now put it around you neck or your head as an usamimi and you’re good to go 😀
Hope you enjoyed it and let me know if you try it out!
|


Want to download this tutorial in one handy file?
How To Add A Pop Of Colour To A Necklace
I’m still feeling really low energy from being so sick at the moment so it’s a quick craft today.
I’m really into big, bright, chunky jewellery at the moment but I think most of the stuff I see in store is ridiculously priced so I figured I would just make some myself. My mum found a cheap metal necklace at a store which was closing down but it was very plain and not me.
This is what a few coats of nail polish did to it:

|
The original necklace:
The polish I used:
It took several coats to get a nice even finish and make the colours really pop. It was very messy trying to get the polish on while they were all still attached. I ended up giving up being neat and using remover to get rid of the messy parts afterwards.
And there it is, bright and pretty! It took a few days because I had to wait for it to dry between each coat.
Now I’m on the hunt for other cheap jewellery I can jazz up. Maybe I’ll check the thrift store and see what pops up there. I just realised that with the sunglasses and jewellery and all the other stuff I’ve been painting more stuff than nails with my nail polish lately XD I should get back to doing my nails!
|


How To Needle Felt Rose Gloves – Tutorial
Recently I have been making a lot of presents for people! I like making presents because it means getting to craft and not having the results taking up a lot of space here 😀
The only down side is I have to wait for them to receive it before I post photos and tutorials haha!
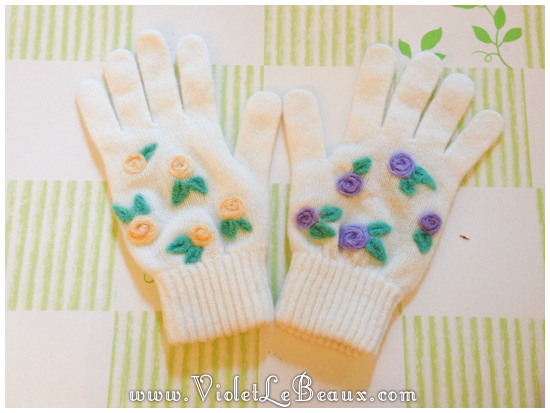
I needle felted these gloves as a birthday gift for Christina who rocks.

|
So how to needle felt flowers? Let’s start! You need:
I decided to do different colours per glove so one purple and one yellow with green flowers.
The gloves!
Stick the brush or whatever you’re using for backing inside the glove. It can be a bit awkward depending on the size. By actually putting the brush inside the glove the sides won’t stick together when we felt them.
Now let’s make the flowers. Felt a small yellow ball to the glove. Poke more around the edges to secure them.
Now punch a spiral pattern into the circle.
Next add a tear shaped petal and poke in the middle as a leaf shape.
Add a second one just overlapping it.
Repeat all over the glove in varying directions!
Cute!
All done! I want to do this to the edge of my cardigans now, it’s so sweet ^_^
Hope you guys enjoyed and I hope Christina enjoys wearing them!
|


Want to download this tutorial in one handy file?

Violet
By continuing to use the site, you agree to the use of cookies. more information
The cookie settings on this website are set to "allow cookies" to give you the best browsing experience possible. If you continue to use this website without changing your cookie settings or you click "Accept" below then you are consenting to this.