I know I know I know I’ve been promising this leopard print nail art tutorial forever! I finally finished it 😀
Apologies for the crappy film quality, originally I wasn’t planning on making this into a tutorial so I wasn’t very careful when I filmed it. I have new software which I’m now learning to use so this is the last of my badly edited/made videos ^_^ So the quality is not great this time but hopefully you can at least get a good idea of the techniques and try it out yourself.
Make sure you let me know if you give it a try, I’d love to start a “Readers Photos” section! Anyway I hope this has helped a bit!
Today James took the photos of the first batch of cool nail art that I’m going to sell so expect a post about it very soon 😀 I’m so excited about this!
I’ve been a bit sick today so I’m off to bed. Night night and hope you enjoyed the leopard print nail art tutorial 🙂
It has been quite a while since I did a post just on nail art hasn’t it?!
I think that’s probably because I’ve been so crazy busy with moving house and everything else I just haven’t had time to do anything fun and time consuming like that. Now that we’re all settled in I’ve finally had a chance to have a little relax and do something for myself ^_^
Yep leopard print! I’ve been a little bit obsessed with leopard print lately!
While I was doing this I videoed everything so if anyone’s interested I’ll make a tutorial. It’s a lot easier than it looks!
Everything was done freehand, I think that the black tips and orange jewels really make it pop, and it looks amazing in the sunlight!
Also I want to give everyone the heads up that I’ll be moving to my own domain soon so you’ll all have to update your RSS readers and favorites etc. Don’t worry I’m going to make it worth your while though… The week that I move over I’m going to post something cool every single day of the week that you guys have been requesting. Lots of tutorials and things and a competition. It’s not quite ready just yet but I hope you’ll all still visit me in my new home 😀
Also don’t forget to vote for my new camera’s name on the side bar! It’s neck and neck at the moment ^_^ Hope you enjoyed the nail art in the mean time!
Well as promised here is my outfit for the Nuffnang awards in all of it’s minute details!
I put so much time and effort into this outfit that I think it deserves it’s own post if only for my records heeheee!
The dress:
I was so torn on what dress design to go with. I wanted something Hime Gyaru obviously but I wanted it to also feel like I was wearing a million dollars rather than something I’d made. Originally I wanted to buy a dress but I couldn’t find anything I liked so I improvised.
This is how it all started out:
I cut one of my basic patterns out of a stretch cream satin for lining.
Then I added the pink flower silk chiffon over the top in the pattern I wanted. I had no end of trouble with the chiffon, I wanted to throw it out the window so many times!
I feel the need to tell you all that I hand pleated the ribbon for the straps (and back up shoes). That’s right hand pleated. No where that could ship fast enough/was within driving distance sold pre-pleated ribbon! WTF?? I really wanted it though so I stubbornly decided to do it myself.
This is the neckline of the dress (yes blacked out the cleavage for protection of your eyes :P) The flowers are all hand sewn on and made of paper, in the middle is a giant heart shaped pink jewel which I just LOVE. The bust has a slight sweetheart line with a row of gathering to make it interesting.
There is also a 3 layer tiered petticoat which I made for this dress specifically. It’s out of cute dot tulle similar to my wrap. I wanted it to have a slight bell shape but nothing as extreme as Lolita so I kept it to 3 soft layers.
The whole outfit
I think this is one of the only photos of me without the wrap. I don’t normally show my shoulders or cleavage so I was a touch uncomfortable without it ^_^ James is taking a photo of my nails.
I made my wrap from some lovely dot tulle (different from the petticoat) which was edged with white pom pom fringing. The pom pom fringing was a super large pain to get as well! I swear that all the fabric shops in Brisbane keep a list of things that I desperately want and all collude with each other to not stock them…
The bag
This is how my bag started out. I got it on sale at Charlie Brown for around $20
I hated the ugly gold chain on the straps so I removed that and added a rose to make it match the rest of the outfit. It’s made of the softest faux leather I think I’ve ever touched.
The alternate shoes:
I found 2 pairs of shoes on sale at Wittner. This first pair was my back up pair, it took me forever to decide whether to wear these ones or the others because these were more comfortable but they didn’t go with the dress well while the others were stunning but were half a size too small *_*
Anyway these were $40 marked down from around $170. Before decoration…
After decoration… Notice the pleated ribbon again 😉
Detail shot: Yep I’m so detailed obsessed that I glued diamantes to the buckles ^_^
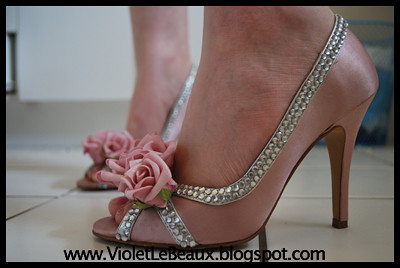
The real shoes
Now this is how the shoes I actually wore started out… On sale for $30 originally like $150ish.
After the Violet treatment…
They are so pretty but holy bajeebus are they painful! Seriously I think I hobbled around for half the night but it was totally worth it XD
Detail shot:
Interestingly enough these shoes tested by deco abilities. I couldn’t use plain old epoxy glue because it was too brittle, every time I put on the shoes a bunch of jewels cracked off. So I came up with the solution of glueing with epoxy first and then doing 3 top coats of plain old craft tacky glue. This gave it the flexibility to move with my feet 😀 Totally interesting right?
The nails
I didn’t get too many detail shots of my nails because I completely forgot about them ^_^ The are a pink base with a touch of glitter, white lace with ceramic flowers in pink and white on the very tips. The white lace even has little roses on it!
Funny story- I ran out of nail glue so I had to rush and get some for the flowers. They didn’t have my usual brand so I just grabbed one marked “Professional”. Turns out what they meant by “proffessional” was actually “rubbish and doesn’t stick to anything”. This lead to all kind of shenanigans with little roses flying off and having to dig around under heavy cabinets to get them back before the night. Lesson: Once you find a good nail glue stick with it!
Thought I’d show you my other nails for the trip while I’m here 🙂 These are blue and blue glitter stripes with silver tips and blue/silver diamantes.
Some of the small diamantes are heart shaped.
The jewelery
My choker, brooch and one of my bracelets were all custom made by the beautiful Celeste from Little Waltz. I commissioned Celestewith a jumble of ideas even before I had a dress and she made the most beautiful pieces for me!
This was the package that arrived from Little Waltz. Everything was packed super well.
The choker is pink pearls with a silver crown backing and a large flower over the top. There is a little chain with more pearls hanging down. The brooch has Swarofsky crystals dangling down in a vintage metal base and a beautiful pink cameo. She also included 2 absolutely beautiful bracelets with diamantes and little bells which jingle whenever I move. When I wear them I feel like a fairy!
I would absolutely recommend Little Waltzfor anyone needing custom or off the shelf jewelery, the designs are wonderful and the craftsmanship is just beautiful. Celeste handled all my panicky emails wonderfully and couldn’t have been easier to work with! The craftsmanship on the jewelery is immaculate and the prices were really reasonable, I’d give it all a 10/10!
The face
I decided to keep my make up fairly simple for the night with some false lashes and a hint of pink eye shadow. Lip gloss was of course a must too! 1000 Hoursent me some lashes to test out so I decided it was the perfect night to take one of the sets for a test run.
This was the set I was wearing, “Wild Damsel” you can buy them at Priceline for RRP $8.95. I used a different glue because of my allergy.
Of course here are some shots of them in action…
I found the application of these to be very easy, they held their shape quite well so it wasn’t a pain to reuse them next time. They were very easy to clean with warm water and with the help of my heated curler they were the perfect shape. I think if you wanted them more or less curled it would be quite easy to achieve. 1000 Hour sent me a couple of other products so I’ll be reviewing them soon for you all too!
Shot to see the length…
Well that’s a wrap everyone! I’ll be back to blogging as normal now that most of the move is out of the way 😀
Hope to see you all at the next Nuffnang Awards next year!
A warning that there are a lot of photos in this Singapore post so be prepared 😀
If these photos just aren’t enough, I’ve uploaded a large selection of everything we took over at my Flickr account. Hey it’s not everyday that someone flies you to Singapore for free so I took a lot of photos!
So starting on Thursday night, our flight was at like 11:45pm so James’ Dad drove us to the airport and we chatted before going through security and customs and doing a little shopping. We were keeping an eye out for Erica from Girl With a Satchel who was the only other blogger coming from Brisbane. We travel in style baby!
This is a kind of silly inside joke but ever since we started going out like 2 and 1/2 years ago James has been promising to buy me a mood ring and he finally did! Hahaha guess what I’m feeling!
The food and service on the plane was lovely, we flew with Singapore Airlines. They gave us little travel packs with socks and tooth brushes, how cute! For dinner we had yummy noodles.
We arrived at the Link Hotel at around 5am and we were all so tired that we piled into bed! Erica was only a couple of rooms down the hall from us which was awesome! She was such a wonderful traveling companion, we had lots of fun together! Here is our hotel room…
To give you an idea of the size, that’s a double bed and the wall is behind the desk on the right. My little laptop Edward lived there but the internet connection was very sketchy so I couldn’t post 🙁
After a few hours napping we met up with Erica, Candice and her husband Craig for an… interesting breakfast. Erica ordered coffee with skim milk and they brought her a cup of frothed milk. I ordered tea and they brought warm milk tea like you would have with pearls in it… it was very pretty though!
After breakfast we headed out to a shopping center and shopped around, the girls were super excited that there was a Zara! We met up with Grace and Dave here and she introduced herself by sneaking up behind me, poking me in the back and whispering in my ear “GIMME ALL YOUR MONEY!!” she managed to scare the hell out of me XD
I bought a pair of earrings and Candice bought me a shiny pink bling ring, the shop assistants kept telling I looked like a Barbie Doll so we took a photo together XD
Erica was sleepy so she went back to the hotel while Candice and I got pedicures! Ah felt so good and so much nicer than the places here in Aus! Woo for deco iphones!
After that we went back to the hotel to get ready for the awards, which you saw last post so I’ll skip to the next morning which was Friday. I stayed up after the awards and got up early so I could pin curl my hair. I was going to take hot rollers but they were too heavy so I learned to pin curl instead. I was super happy with the results and they lasted all that day and night! James and I met up with Candice and Craig for breakfast at the hotel before the tour started.
Our first stop was the Mint Toy Museum… which is exactly what it implies: a museum for old toys in mint condition. Our tour guide was hilarious, this kind of sums the whole thing up:
I got to pose with a life size model my childhood hero Tintin and his dog Snowy as well as Captain Haddock so I was happy!
We were literally like kids in a toy shop amongst all of the memorabilia! Old favorites like Strawberry Shortcake brought back childhood memories and it made me sad to see the new slutty version they’re trying to pedal now.
Next we went to the Museum of Early Chinese Settlers. You should all note that I’m saving the cutest girliest photos for a special treat on Monday or Tuesday 😉 You’re going to love it!
We stopped for lunch at an insanely busy crowded pavilion. Everything was so cheap and there were so many smells in one small area!
It was so awes
ome to be with other people who understand the importance of photos XD
Our next stop was the Singapore Planning Museum. They had a replica of all of inner Singapore in miniature! Oh what’s that I spy down there?
ZOMG IT’S GIANT VIOLET ATTACKING THE CITY!
We stopped off for a spot of shopping but the museum of planning kept reminding me to look at the architecture XD There were so many pretty buildings, I wish my windows were rainbow!
The next stop was Merlion park which I was totally looking forward to!
We spent ages just being silly and taking photos, most of those will be in the post on Mon/Tues.
Lots of posing!
Our next stop was the Singapore Flier which is basically a very fancy ferris wheel.
The view from the top was great!
We were fortunate that our capsule was full of awesome people!
It was such an action packed tour that Nuffnang had planned at this point we took some time out to just chill with some cocktails at the bay. I had a mocktail version of the “Sinagpore Sling” and it was yummy!
Little Immy was so adorable she had herself a bunch of admirers when the day was done. Here she is with Martin from Nuffnang, she was eating ice cream, too cute!
James made me take this picture of him next to the bus. Low brow humor…
That night we went to a crazy shopping center called Mustafa. There is no way to describe it other than insane. So huge, sold everything from cosmetics to diamonds to cheap shoes to frozen goods to ANYTHING. It was so hard just to find the exit once we were in *_* The lights outside were beautiful though.
We had dinner at a celebrity hot spot (apparently) and out the front there was the ultimate deco project… a motorbike!
I had the most disgusting grass jelly drink for dinner. It was like frozen rice noodles in sugar water. ICK.
After a good night’s sleep we were ready for shopping again 😀 Quick breakfast and some photos.
We headed off to Orchard Rd for fancy upmarket shopping.
I bought a bunch of Japanese magazines, I was so happy! They are like 1/3rd of the price compared to Australia!
The boys played Wii Sports Resort while we all shopped.
Then it was our last shopping stop for the trip…. SIM LIM SQUARE! Everyone had been waiting so long to get here, it’s basically a whole shopping center devoted to gadgets and cameras 😀 I wanted to get a video camera (mission unsuccessful) and James wanted to look at lenses. We ended up spending 3 hours there because everyone wanted to bargain for things! Some of the guys got really good deals t
oo 😀 I had a hilarious experience with Grace as she put on her famous Singaporean accent to try and bargain on my behalf XD The shop keeper was a nut job and he was yelling at us not to leave! Grace’s bargaining skills were so awesome she even got $5 off a steam iron which was supposed to be set price!
While we were wandering around waiting for the boys to finish haggling Kruppy took us on his magical tour of the past and educated us on the subtitles of the landline phone XD
Apparently his tour made him so tired that he felt the need to try out a magic eye massaging gadget… hahaha! I sure hope he didn’t sustain any lasting damage ^_^
Oh and I couldn’t help but share the signs we could see from the hotel… Frog porridge sounds interesting! We were all daring each other to try it but there just wasn’t time!
After all that there was time for one last hurrah online and then a dash to the airport!
Erica can testify to the fact that our taxi driver was the funniest man in the universe! He was giving us the good old cab driver philosophy and saying we should work less and enjoy life before our retirements! We were convinced he should write a book.
At the airport we grabbed some dinner and did a dash to the plane (almost missed it oops!). James couldn’t believe there was a Burger King, he was so excited! In Australia Burger King is called Hungry Jacks because when it first arrived the name was already taken, so it’s a novelty.
On the plane back I managed to get some sleep, dinner was some kind of fish which was icky but smelled good.
The best part was desert which was chocolate covered icecream bites!
James really enjoyed his hahahaha!
And that was our lovely trip! Now what you really want to see… the loot XD
Here’s the candy!
Things that I bought:
Nuffnang Australia had these awesome shirts made up for us, I love the one I got!!
And look… FOREIGN BUENO! And yes it tasted just as good 😀 Damn Kinder, just sponsor me already 😉
To say thank you very much to Nuffnang and all the sponsors James and I made this photo <3
I had such a wonderful time in Singapore, I wish it had lasted longer but it was lovely and it all feels like a dream now 🙂
There are some days when absolutely nothing seems to work the way it should. Work explodes into a hot sticky mess, your hair won’t sit right no matter how much hair spray you use, there is nothing but spam in your inbox and you have a migraine the size of China. I am having one of those weeks!
So what to do in this situation but take a little time to yourself and relax.
If you’re anything like me you’re not very good at relaxing. I am the kind of person that needs t do like 10 things at once or I’ll get bored and feel unproductive. So this is my guide to relaxing.
Life can be very tiring!
This is my secret relaxation kit, what you can see is: -Pot of tea (blueberry) -Tea cup (the cutest one you can find), milk and sugar -Face and hair masks -Sleep mask -Nail polish and toe separators -Bueno (Damn it Bueno sponsor me already so I can have free ones!) -Cute silver tray to carry it all on. -Advil to remove horrible headache or something stronger if needed
Optional: -Water bottle -Tv with Judge Judy on because she is hilarious -Body butter for massages -Boyfriend to apply said body butter, nail polish, pour tea, feed Bueno etc.
All of this should be done in bed with lots of comfy pillows or on a relaxing couch in front of the tv.
Preparation: -Make a pot of tea and collect all the needed equipment -Have a warm relaxing shower and wash your hair out, hime styles can be very tough on your hair with all of the spraying and teasing so give some love back to it!
-Apply the hair mask according to the instructions and clip your hair back to let it dry.
My favorite brand of facial mask is Montagne Jeunesse but they are all pretty much the same so just get whichever is available to you. This one is a self heating one.
It looks super gross. Apply the mask according to the instructions, make sure to check how long you need to leave it on for.
At this point you probably look like a swamp monster so take a moment to enjoy that feeling. This effect works even better if you haven’t shaved your legs for ages 😉
Now while the face mask is setting you can take the time to paint your toe nails. If you wear high heels all the time you could also take the time to give your feet a massage, feet take a lot of weight so treat them nicely!
My poor feet are covered in blisters at the moment because I wore some heels without stockings one day ;_;
If you want them to look extra special add some diamantes or a cool konad design. Now I usually make the tea so it has a chance to cool while I take off my face mask. I like lots of sugar! Having a cute tea pot is very important 😛
And don’t forget the Buenos! There is one for me, one for James… or maybe both for me! Before you eat you should wash all of the face mask off. Your skin should feel smooth and beautiful. Then you can enjoy your tea 😀
And if you feel like it you can take a nap! Naps are awesome, more people should take naps. Shh I’m trying to sleep! At the end of this you should be very chilled!
So what do you do to relax when you’re having a crap day?
Hey everyone! How are you all doing? I have lots to report today, the biggest part of this post is going to be the hair tutorial that I’ve finally finished but other things first…
We’re doing this style today:
But first… remember the post I made about the Nuffnang Coles/Myer gift card competition? Well I won! I couldn’t believe it, I never win anything so this is awesome! They are sending out my $100 gift voucher so I’ll be sure to let you all know how I spend it ^_^
Don’t forget that Nuffnang is also holding the first annual blogger awards so if you enjoy reading what I write feel free to nominate me ^_^ and cross all your fingers and toes for me! I want to go to Singapore!
Next in the news is the guest blog post I did over at Lisa’s blog. I did a summer themed mani with fimo fruit so click the picture below for the full story 🙂
One more piece of news before I get stared on the hair tutorial! This is directly related to the tutorial though, on the weekend I used 1000hour eyelash glue and had a terrible allergic reaction to it. My eyes swelled shut and so I’ve had to photoshop some of these photos to not look completely ridiculous, the photos also saved really low quality due to a glitch in the camera so bleh. I’m going to be writing a review on the lash glue later this week and let’s just say it’s not exactly glowing but I’m waiting to hear back from their customer service department about treatments.
Without further ado, onto the tutorial!
This tutorial is for how to create this hairstyle. I’ve heard this called several different names (double french twists, 60’s rolls etc) but I think the name “Kitty rolls” is cutest because it reminds me of Kitty from “That 70’s Show”! This is a great style for when your hair is a bit dirty or you’re rushed for time.
You will need: -Hair spray (I’m going to review this brand later this week too)
-Bobby pins and a brush – An alice band (optional) First brush out your hair backwards so there is no part.
-Lightly spray the top and sides of your hair. This is just to give it some texture and get the bobby pins to hold. Now you should seperate a section on each side of your head. Imagine drawing an invisible line from each ear and pulling everything in front of the line forward.
Put these two parts to the front and sit the alice band behind them. This is so when we twist everything together you can hide the ends of the alice band. See the placement? Now get some bobby pins ready. It’s good to have them on hand so you don’t have to drop any hair bits to find them. I have a bad habit of opening them with my mouth XD
Start on one side and brush out one of the front sections.
Twist this section backwards.
And then place it (not too tightly) backwards and behind the alice band. This photo has been censored for my frilly peace of mind! It was a seriously bad allergic reaction! Ok now pin it in place. The best way to do this is to open the pin, grab the edge of the twirl and the push the pin into the rest of the hair with it’s open edges towards your face. This is a very sturdy way of securing the hair. Here is a video:
Haha you can here James saying “like so” at the end XD Anyway it should look like this:
Now grab another section of hair a bit bigger than the last.
Pull it upwards and twist it around the last section of hair.
Pin it in place It looks like this: Keep going grabbing sections of hair and twisting them until you reach the middle of the back of your head. Now do the same to the other side! Exactly the same process on the other side until you reach the middle. It should look like this:
And from the side: Now the back part is a little tricky so I’ve got another short video down lower. Grab all the loose hair and carefully brush it out. Spray some hairspray on it to give it some more hold.
Get those pins ready again! Ok with the hair between you fingers, roll it up. Depending on your hair length you might need to roll it over twice.
Hold it there and pin through the holes on each side until it’s secure.
Here is a video:
Ok so you’ve got the back part now it should look like this: See that weird hole in the back, let’s get rid of it!
Here is how it looks from the back, basically just keep adding pins until you’re happy with the shape. The easiest way to do this is to use a second mirror to see exactly how it looks.
Time to decorate now! Get any clips or pins you want to put in the back. The good thing about hime gyaru fashion is that you can cover any mistakes with extra bows or flowers ^_^ Don’t forget to give it a good spray, you don’t want bits coming down during the day/night.
I added two flower pins and a big rose barrette thingy that I made the other day.
And from the side: Finish doing your make up, add a bunch of accessories and you’re ready to go! Taadaa!
Well I hope you enjoyed the tutorial, once you get the hang of doing the twisting it only takes about 5 minutes. I’ve even managed on a train on the way to a job interview once XD
I’ve decided to make this week’s blog posts all about hair and beauty so expect more of this!
Lastly I’ve been considering making full videos for posts like this, would it be easier to tell what is going on in a video? Would you guys be interested in watching videos I make or prefer I just shut up and blog?
Illustrator. Strong tea, knitting, watercolours, and making a video game called Moonlight in Garland. Living with her adorable husband Jimmy, fluffy puppy Miss Lottie and Bergamot Bunny in Melbourne, Australia.
By continuing to use the site, you agree to the use of cookies. more information
The cookie settings on this website are set to "allow cookies" to give you the best browsing experience possible. If you continue to use this website without changing your cookie settings or you click "Accept" below then you are consenting to this.